
When I shared my son’s bedroom makeover a couple months ago, I had a lot of comments asking me for a tutorial on how I made that wooden arrow (seen below) on his wall. So I promised I would make one, and that day has come. Excitedface!

Now, I’m not hugely experienced in the tutorial-ing, but don’t worry. This is a super-easy project that you can do in no time. So here we go!

Since my son’s bedroom is already sporting the original arrow, I decided the new one would have to go in a different place, and hey, might as well make it functional while I’m at it.
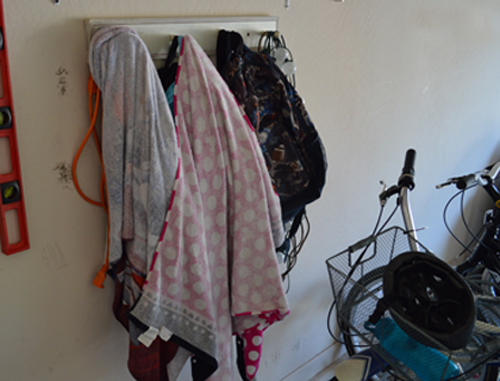
As you can see, this little coat rack in the garage was working overtime. Not only that, it was way too high for the kids to even use, which resulted in an explosion of backpacks and accompanying schoolwork-shrapnel that scattered all over the house as soon as they walked in from school.
Thus, a new coat rack was in order: larger, lower, and arrow-shaped for funzies.
Here’s the how-to. First, get yourself a nice long board. I picked up this pine board from The Home Depot for about $10.

Next, sketch out your arrow shape. The level wasn’t really necessary for leveling at this point, I just used for the straight edge. I highly recommend using a speed square though, it’s very helpful with the angles. Speaking of angles, you can see I sketched out a couple different ones at the tip of the arrow, and didn’t go with either one! No right or wrong way to do it here, just trust your eyeballs.
I will say not to use the same exact angle at the both ends of the arrow, it just looks a little off to me. Mine is deeper (obtuser? acuter?) at the end. But it’s not rocket science, do whatever looks good to you!

Here is where I ran into a little difficulty. This board was only .5″ thick, but it was still a lot thicker than the board I used in my son’s room, which my little jig-saw cut with ease. But with the thicker board here, my jig-saw was getting all constipated about it, and the cuts were not as straight as I’d like. So keep that in mind when picking out a board. Or a jig-saw. I did use my circular saw to cut the ends of the arrow, which was a piece of cake.
I sanded it nice and smooth, then beat it up with a hammer to distress it a bit. I like how the stain settles into the nicks that way.

And speaking of stain, you might have noticed that mine is bright orange! Not a shade you usually find in the paint aisle, true. This one is called Citrus, and it’s the perfect product if you are torn between painting something or letting the wood-grain shine through. Best of both worlds! See what types of stain your local home improvement store is offering; most manufacturers have a wide range of colors to choose from these days.


Screw in a few hooks, (now that I look at it, I think I’m going to add a few more to mine, there’s definitely room), screw it into your wall, and you are done-zo! Pat yourself on the back!

I think my next step for this area is to make these rolling storage cubes for underneath, how cute would that be? Then the stray-shoe and backpack monster would be forever slain!
If you have any questions, let me know in the comments!


7 Comments
MUMZY
October 10, 2013 at 8:13 AMLove it! I need a smaller one for my laundry room!!!!!
Danielle
October 10, 2013 at 8:18 AMI definitely need this for my little guy’s room! I’m LOVING all the projects from you lately!
Lindsey @ Better After
October 10, 2013 at 8:46 AMThank you so much Danielle! 🙂
Beth @ Sawdust and Embryos
October 10, 2013 at 9:19 AMI love that it’s shaped like an arrow! And the brightly colored stain! I’ll have to check out their collection if colors. 🙂
Bethany
October 10, 2013 at 12:08 PMLinds, I love your stuff, every post is so inspiring!! I had the same monsters to slay, so I created a little backpack area myself. I would be so honored if you would feature it on your blog!
http://scattershotdotcom.wordpress.com/2013/03/06/the-backpack-wall/
Thanks,
Bethany
Tristie
October 10, 2013 at 10:30 PMYAY! I am doing this. Thank you for posting a great idea. Love the stain, too.
Kris {Driven by Décor}
October 11, 2013 at 5:03 AMVery cool project – thanks for the tutorial!