0

Living Rooms

Kitchens

Furniture

2 In desks/hutches/buffets

Arrow of Love

“SHOT THROUGH THE HEART! AND YOU’RE TO BLAME! YOU GIVE LOVE … A BAD NAME!”

That is exactly what you could expect me to sing to you if we were shopping in Hobby Lobby and we happened upon these adorable arrow handles as seen below, and I would carry one around with me in the store, and point it dramatically at you at random intervals and sing that song embarrassingly loud and passionately, and people would stare, and you’d regret taking me out in public, but secretly you’d be laughing on the inside.

Wouldn’t that be fun?

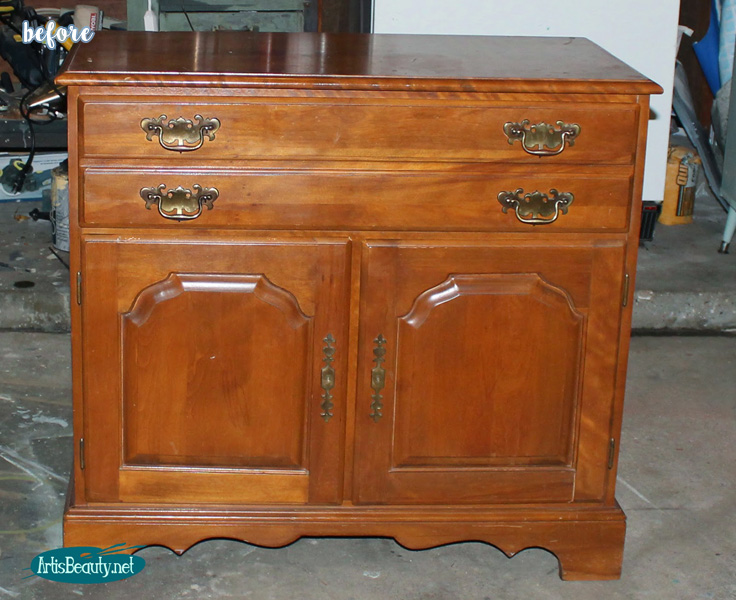
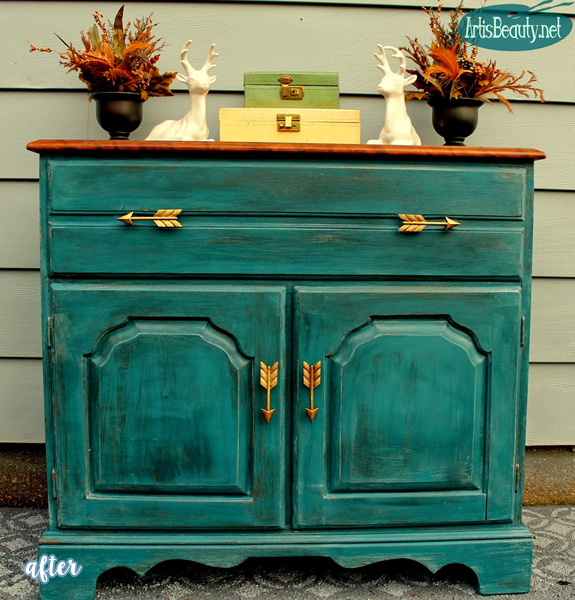
Karen added the infamous arrow handles to her little buffet and painted it teal, and it’s officially 1000 times better looking than before.  See it at Art is Beauty.

Teal Buffet Makeover Before


Teal Buffet Makeover | betterafter.net

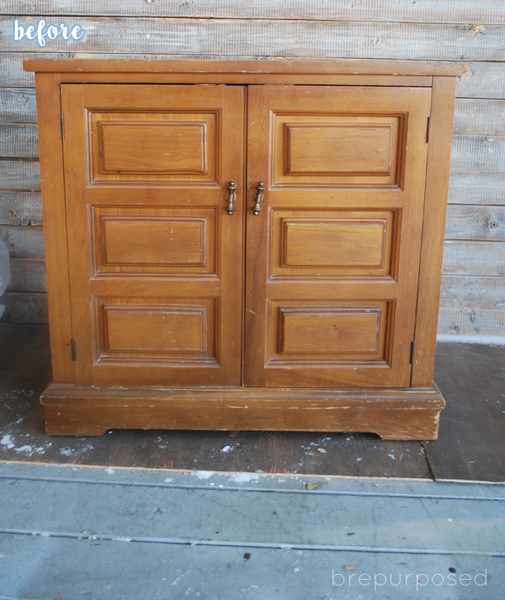
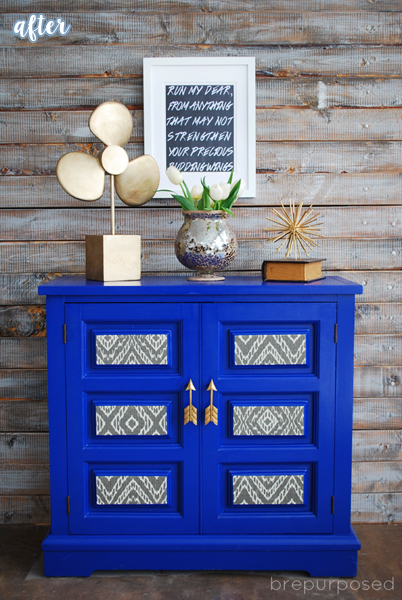
Bre at Brepurposed also used them on this super hip chest makeover. They look so great against that deep blue!

Blue Cabinet with Arrow Pulls Before


Blue Cabinet with Arrow Pulls Makeover | betterafter.net

I’m no stranger to the arrow handles either, and used them on my giant bookcase makeover. Like I said, I got mine at Hobby Lobby, but I did see them on Amazon too, although a bit pricier, right here: Gold Arrow Handle. <–affiliate link

1 In innovative idea/ kitchen/dining

Stripes from the Past

I loved this makeover as soon as I saw it, and as I was halfway through preparing to post it, I realized … I’ve loved this before. I did a little digging through my archives, and sure enough, I had already featured it way back in 2012. So if you were with me then, I hope you eyeballs enjoy this little trip down memory lane, and if you’re new here, just pretend we never had this talk. I’m totally on top of things. Yep.

I think it’s even more relevant now, now that black and white stripes are becoming super popular everywhere.  I can’t walk into a store without seeing 35 black and white striped shirts for sale, and then buying them, because I can’t seem to help myself. You should see my closet. If you follow me on instagram you saw my addiction a few weeks ago.  You’d think I had a full-time referee job by the looks of things.

So! Here we go again! Please enjoy this little makeover from Gemma at The Sweetest Digs.

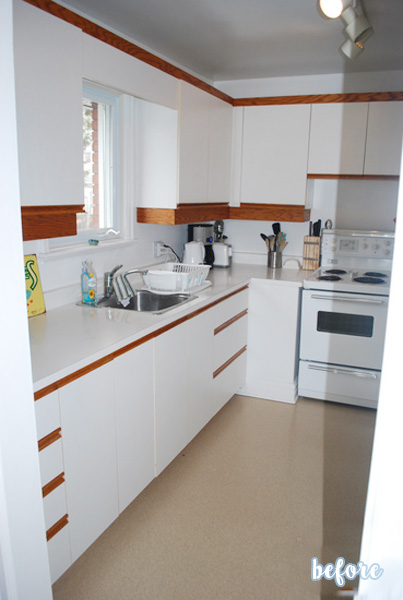
Black and White Striped Kitchen Before


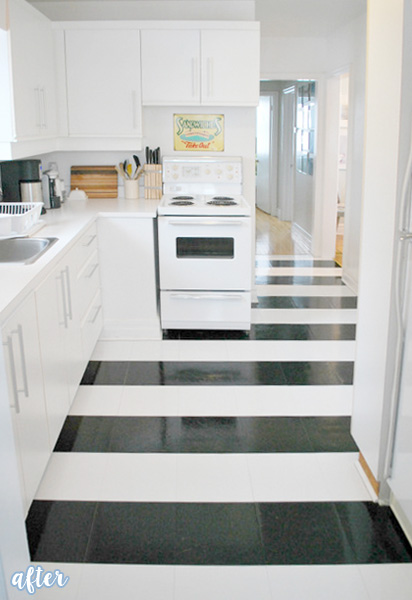
Black and White Striped Kitchen

At the time, she was looking for a quick fix while she saved for a full-blown remodel, and these peel and stick vinyl tiles did the trick.  Now, she’s just about done with that full-blown remodel, and I can’t wait to see it all come together!

29 In innovative idea/ My House/ office

The secret recipe for magnetic paint success!

>>>this post is in collaboration with MagnaMagic and contains affiliate links.


Remember about one hundred years ago when I told you that MY GALLERY WALL WAS HIDING A SECRET?

You probably don’t, so let me remind you. Here is the gallery wall in my office:

gallery wall straight on

IT HAS A SECRET.

Some eagle-eyed viewers were quick to spot it … and some other readers guessed that the big secret was that I was pregnant. (I guess the giant pink YES and my unflattering reflection in the convex mirror could give you that idea).

So no, I’m not pregnant.

The secret is that everything on this wall is being held up with MAGNETS! And underneath the magnets? Magnetic paint, of course!
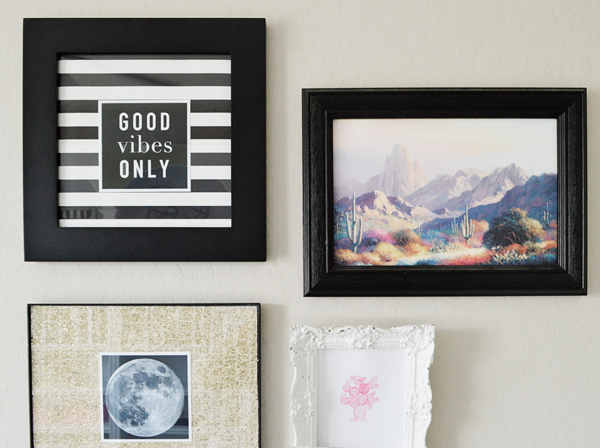
gallery wall vibes

“No!” you are shouting aloud.

“It can’t be true!” you are gasping to yourself.

“Everyone knows that magnetic paint is the biggest lie the decor world has ever seen!” you are sputtering angrily. “I’ve tried it myself! Sixteen coats of ‘magnetic paint’ later and I could barely get a refrigerator magnet to stick to my wall, let alone hold up anything heavier than a single piece of paper!”


Shhhhh my friends. Calm yourselves. It’s true. Here are the two things you probably didn’t have.

#1 – the right paint

#2 – the right magnets

That’s it. That’s the recipe for magnet wall success.

MagnaMagic Magnetic Receptive Primer

This paint I used was MagnaMagic Magnetic Receptive Wall Paint. There are a couple other options from this company, including a magnetic chalkboard paint, but I chose this one because it’s actually a primer, which means it can be painted over. Very helpful if you want to have an incognito magnet wall.

It goes on a dark gray color, which I just painted over with my regular wall color once it dried. I used a quart which covered a rough 5’x5′ square patch on my wall. You may think that’s not great coverage for a quart of paint, but we’re not after coverage here, we’re after concentration. It’s going to take a few coats to reach maximum magnetic potential. I simply kept coating the area until I had used all the paint. That’s key.

It’s important to note that I did not tape off this 5’x5′ area.  Otherwise I would have had obvious lines when I removed the tape, even after painting over the gray magnetic paint with my regular wall color. I just make a rough 5’x5′ splotch, feathering out the edges so it would be unnoticeable where the magnet paint stopped and the regular wall paint began.

side view of magnet

Next, you can’t just use any old magnet. Oh no no no no no no. NO. Don’t try it. You will surely drink the bitter tears of disappointment. The only magnets I’ve found that will work on my wall – which were suggested to me by the kind MagnaMagic folks – are the Hooked on Paint Hanging Magnets.

(UPDATE! Unfortunately, these magnets have been out of stock for like, years now. Get your life together Amazon. The closest replacement I’ve found so far are these Super Strong Adhesive Disc Magnets, which I have not tried myself, so I can’t make any guarantees).

back of magnet

In fact, they are strong enough that the smaller items on my wall … other than the few you can see that are obviously held up with thumbtacks, (wooden thumbtacks, mind you, because I keeps it classy) … have only one magnet on the back. The larger items, like the YES and the white photo display frame have four each. And they are extremely secure.

I like to show people all the time like, “Hey! Come look at my wall! Now look at this!” And I dramatically rip something off the wall, then dramatically toss it back on, and everyone is always amazed.

So many fun ways you could use this. I heard a rumor that you could potentially even hang a TV. I have not tried that myself, and I imagine that would require very many polymagnets, so if you try it and it doesn’t work out, don’t come suing me, but if it DOES work out then good for you!

I just love the fact that I can rearrange my wall however I want, whenever I want.

Gallery-Wall-Gif

No nail holes, no damage, and endless possibilities! Every wall should be a magnetic wall, that’s what I say.

What say you, you creative souls? How would you use magnetic paint in your space?

12 In kiddie/ tables/dressers

Nursery Schooled

Now that I have four kids, there are a lot of things I wish I could go back and tell myself when we had our first child.

One of them is: don’t waste any time or money on a diaper genie. Gross. A diaper genie, if you don’t know, is a little apparatus for disposing of dirty diapers. Only you don’t really dispose of them until it gets full and you have like 40 diapers sealed and stuffed inside. I dutifully used the diaper genie all throughout my firstborn child’s diaperhood and then finally wised up to how nasty the whole thing was.

Another one is: don’t waste money on a beautiful crib set. Blanket, sheets, crib bumper, skirt, the whole bit. I understand the appeal. There are so many super cute sets out there, and you want your baby’s crib to be 100% adorable. Here’s the thing. Your baby will DESTROY it. He will poop, peep, barf, drool, stomp, jump, and chew on it. By the time your kid is 10 months old, it will look like you’ve been keeping a billy goat in there.

Another thing I’d like to tell my new-mom self it this: “Look hun. Just because you are young and broke doesn’t mean you and your baby have to settle for particle-board furniture you found in the clearance aisle of a going-out-of-business K-mart. Head on down to the thrift-store, pick up some solid wood furniture, and PAINT IT!”


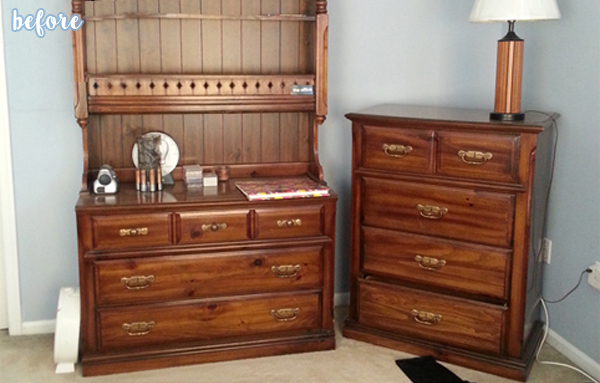
But Tara was already hip to this fact that I wish I knew 13 years ago. She saved big on her nursery furniture by using this old set that her husband still had from his childhood. It didn’t quite fit into her ‘white, gray, and pink’ motif, but …

White Nursery Furniture Before


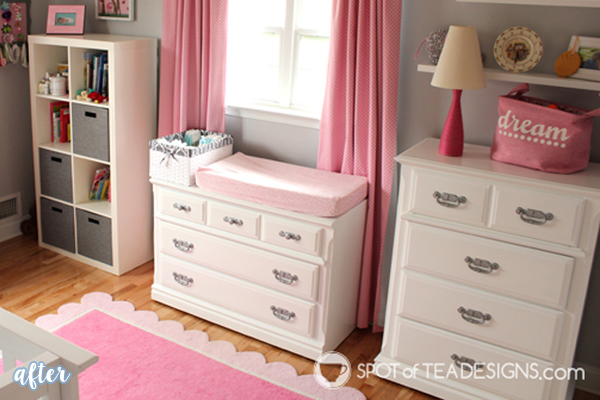
White Nursery Furniture

… that’s what paint is for! Stylish, sweet and sentimental, and perfect for a new baby girl.  See it at Spot of Tea Designs.


Do you have any advice you’d love to go back and give yourself? Tell me tell me!

6 In chairs/ottomans/seating

A Tuffet Act to Follow

Ottomans have nearly as many names as they have functions. They are also known as footstools, hassocks, tuffets, and poufs. If you really want to impress your friends, next time you throw a party and need more seating, just say something like, “Excuse me while I go fetch my party hassocks.” Everyone will think you’re super cool.

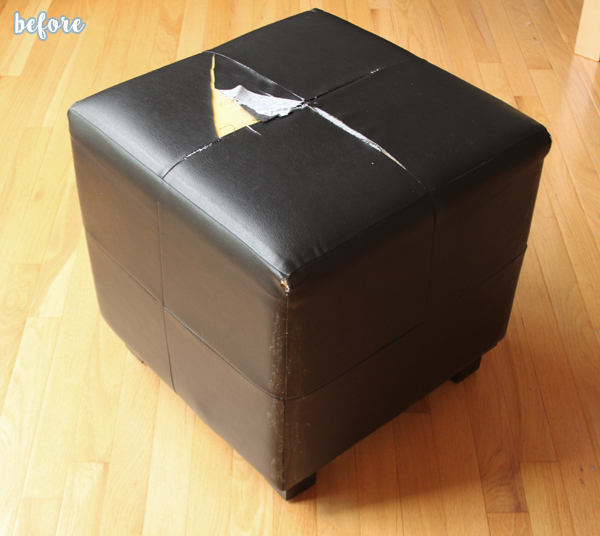
Unless of course, your ottomans are in sad shape. That’s a surefire way to kill a party. You might as well just run out of food and unplug the boombox at that point. But don’t worry! Your pooped poufs can be saved in no time.

Blue and White Ottomans Before
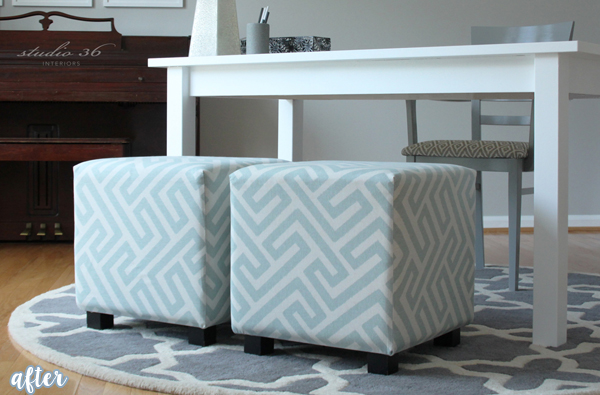
Blue and White Ottomans

Stephanie at Studio 36 Interiors simply recovered her torn-up tuffets and they look better than new. She has a tutorial on her blog and makes it look incredibly easy. It’s basically sewing straight lines. You can do this.


If your footstool has bigger problems, like this one from Estella that was clearly unraveling, don’t fret! You don’t need to be some kind of weaving wizard, you just need to know how to wrap a present.

Bird Ottoman Blue Before


Bird Ottoman Blue

Yep, that’s the basic gist of what happened here. She tore off the string completely and stapled on heavy duty webbing instead, then fleshed out the sides with cardboard (cardboard!) and batting.  The fabric was wrapped around and stapled on, with the beautiful bird embroidery sewed to the top. See the step-by-step on Estella’s blog Star of the East


But wait! She had so much fun with that makeover, she decided to do another!  She wanted a kitchy and colorful look for this little ottoman, and when she found a piece of needle-punch embroidery in her stash, she knew it was a perfect match:

Colorful Ottoman Before


Colorful Ottoman

I’m not sure what it says, but I’m betting on “party hassock.”

If you want to see more, plus the *real* translation, head on over to her blog Star of the East.

5 In chairs/ottomans/seating/ tables/dressers

I’m no cheetah, I ain’t lion.

They say that cheetahs never change their spots, but that’s not true for chairs. Chairs can change at anytime. You could change up a chair tomorrow.  Or today!

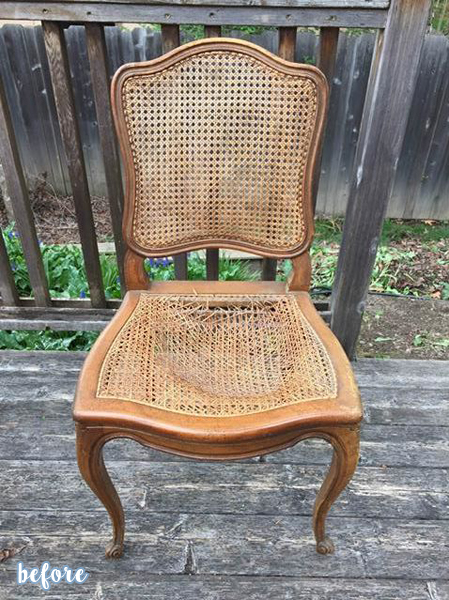
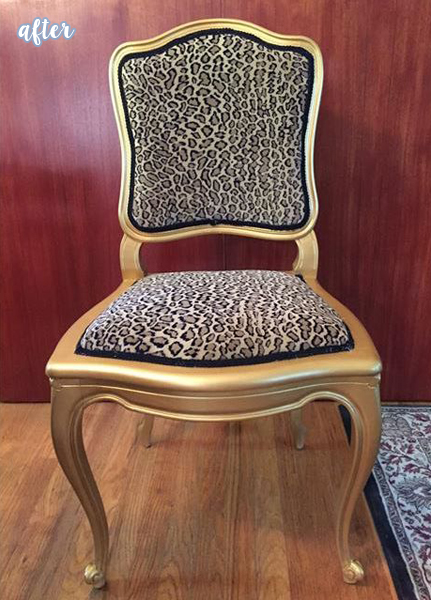
Jan at Chairished Furnishings changed her chair to cheetah. Whoa. That just went full circle.

Cheetah Cane Chair


Cheetah Cane Chair Before

I picture this belonging to a fabulous woman, sitting inside her huge and fabulous closet and there is also a black lacquered mirror and a gold chandelier in there and everyone O.D.’s on fabulousness. Right?

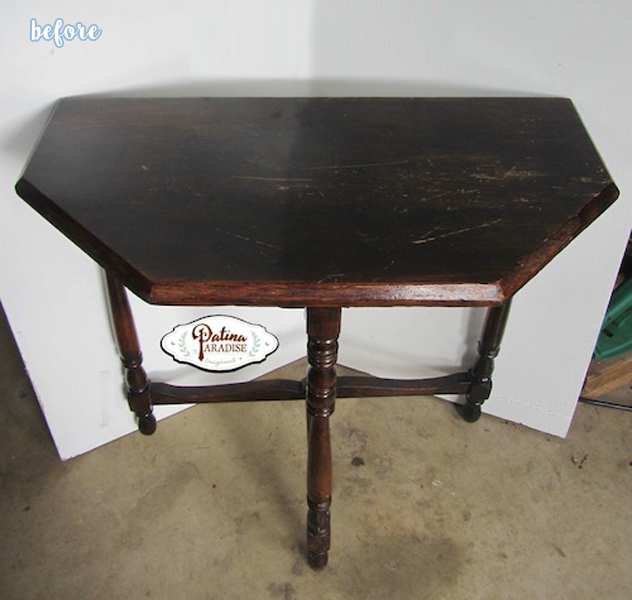
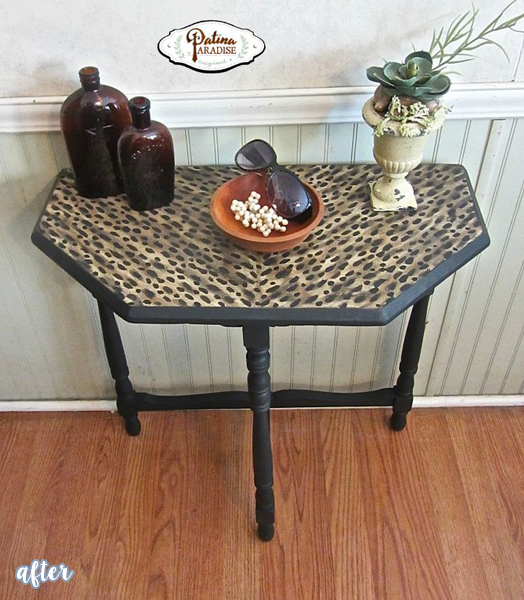
Now, you might be tempted to think that this little table makeover by Lucy at Patina Paradise is also cheetah print, but nope it’s not.  I’m not lion. (HA! Sorry).

Faux Leopard Table Before


Faux Leopard Table

According to Lucy, it’s actually leopard.  I wonder what the main difference is between cheetah and leopard. Hang on, let me Google.

Ok, I’m back. This is what it says: “The leopard’s spots are called rosettes, they are more of a cluster of black spots with a dark brown spot in the middle. The cheetah’s spots are a solid black dot.”

Wait a minute. That means that everything I told you before that was a lie. The chair is leopard and the table is cheetah! Whew. Thanks for setting the record straight, Google.

#themoreyouknow #shootingstaremoji

Protected By
Shield Security PRO