
Have you ever wanted to learn how to paint upholstery? If you said yes, keep reading!
If you said no, keep reading anyway! I like you. Don’t leave.
Today I’m going to show you how I painted this thrift-store chair for my daughter’s room. It’s definitely not perfect, but I think it turned out pretty cute. Best part: it’s EASY!

The before was most definitely NOT cute. It was probably harboring a disease. But let me tell you, this thing was built to last. Even though the fabric has seen better days, and those days were probably decades ago, it is still in amazingly sturdy shape, and didn’t have a single hole or tear.
That’s super obvious step #1 when painting upholstered furniture: make sure there are no holes or tears. Paint won’t fix them. I’m sure you knew that.

Step two: make sure the fabric of your piece is a nice flat weave. No fluffy, velvety fabrics allowed. You are one-way trip to Crustyville with a layover in in Crunchy Town if you attempt to paint anything like that.
Step three: spray your fabric lightly with water. This is supposed to help the fabric not drink up your paint, but it’s going to drink it up pretty good on the first few coats anyway, so honestly spraying it might not make any difference at all. But do it anyway. Why take chances.
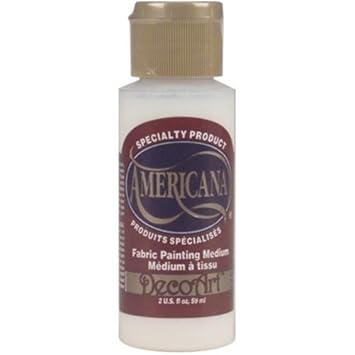
Step four: mix a fabric medium into your paint. (I just used plain old white interior latex paint). The fabric medium is supposed to help your painted fabric feel less like paint and more like fabric, plus help with durability. I dutifully mixed up some fabric medium in my paint, and my chair feels like plastic. Nice, soft, waterproof plastic, like what outdoor fabric feels like, but it’s definitely not fabric-y anymore.
So now you know.
Step five: don’t panic. It might feel like your chair will require 10,000 coats of paint to acheive adequate coverage. It won’t. Keep going!
Once you’ve applied the final coat, it’s almost time to polka-dot! But first, measure.
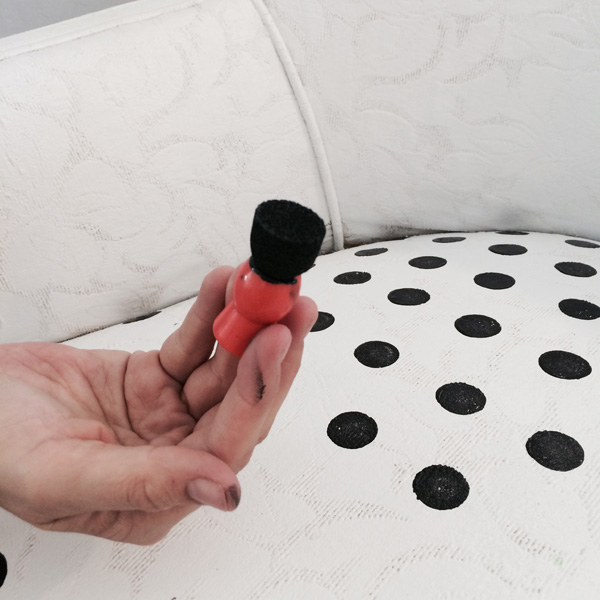
I measured and marked a little pre-dot every two inches. This was tricky around all the curves and angles of the chair, so my advice is to use a washable marker to make your marks, because you most likely will be wiping them off and readjusting them as you go. It’s tempting to just eyeball it, but trust me, measuring is key.

And now, we polka-dot! Making the polka-dots was the funnest part. I used a circle sponge and just gently twisted it around to form a nearly perfect circle. My sister the hand-model helped, which made it go so much faster.
Coming along!

If you look closely, you can see a few splotches, but touching them up was no trouble at all.

And that’s it!
Again, it’s not perfect, but unless you are looking really hard for the imperfections, your eye just goes right over them and sends a signal to your brain and that signal says “Whoa! What a cute little chair!”

Feel free to ask me your burning upholstery painting questions in the comments, and also feel free to pin and share this post! You’re the best.


28 Comments
Ann Schaffer
September 25, 2015 at 7:15 AMSO cute! Thank you for the tutorial, Lindsey.
P.S. Don’t think all of us have forgotten about your hilarious first attempt at painting a sofa. You had me scared off the furniture-painting-wagon, but now I’m getting back on board. 🙂
Kathy
September 25, 2015 at 7:39 AMI love this – very, very cute!
But I know you’re a grammar geek, like me, and so I have to ask: what’s with ‘woah’? Is it supposed to be the word ‘whoa’? Or, perhaps, it is some trendy new word. Maybe? I see it all over and I just wonder if folks don’t know how to spell ‘whoa’. You’re welcome to delete my comment; it’s pretty off-topic. But, I want you to know that read your blog at least daily.
Lindsey @ Better After
September 25, 2015 at 11:05 AMHaha, I had no idea ‘woah’ was incorrect! I went to educate myself on the subject and found this: http://www.slate.com/articles/life/the_good_word/2013/12/whoa_or_woah_correct_spelling_and_variants_of_the_increasingly_popular_word.html Be assured that I will never use it wrong again, just like when I finally learned once and for all where the apostrophe goes when shortening years, as in ’80s not 80’s. At least I didn’t spell it WHOAH! 🙂
Catherine
September 25, 2015 at 8:36 AMThis is super cute and I’m not a fan of polka-dots, but I would have this in my home. That was one steady polka-dot hand you have there.
Sarah Shelly
September 25, 2015 at 9:44 AMSo I’m in love with this. So super cute. I have a playroom that needs something awesome like this… Thanks for the great idea.
xoxo,
Sarah @ Backwoods Babies
Katie
September 25, 2015 at 11:33 AMI’m so glad you mentioned the texture of the finished item will not be fabric like. I kept hearing about painting upholstery over the last few years, so I finally tried it on a chair (the upholstery of which I loved, but everyone else hated, and didn’t really go with anything else in our house.) Aaanyway. It was just a plain flat weave, but the result wasn’t anything I wanted to curl up in. It was stiff and scratchy. I used Martha Stewart’s fabric medium according to directions. We got rid of the chair.
Alicia G
September 25, 2015 at 11:44 AMWow! What a beautiful chair! Your daughter is blessed to have such a talented Mom.
I love reading your blog, your great sense of humor has brightened many of my days. God bless you!
GingerLola
September 25, 2015 at 1:55 PMIt looks wonderful, I’m always afraid to paint fabric but your post inspires me to try it 🙂 Thank you
Cat
September 25, 2015 at 9:00 PMHow long did you let the chair dry between coats?
Cat
September 25, 2015 at 9:05 PMOh! Another quick question. You mentioned it was hard/plastic-y after painting so, can you still sit on it or is it going to crack?
It looks darling.
julie
September 25, 2015 at 9:48 PMThat chair is adorable – you did a great job! It would look cute with the piping in black too 🙂
Abbie
September 26, 2015 at 7:08 AMAdorable! Your daughter is super lucky! Her room is adorable, and that chair is just awesome! Great job!
Paige
September 26, 2015 at 8:31 AMThe chair is super cute! Given the option – would you recommend painting a chair or buying a slipcover if I am aiming for comfort? Thank you! 🙂
Lindsey @ Better After
September 26, 2015 at 5:22 PMIf it’s a chair you’re planning to sit in and use regularly, then slip covering it is probably the way to go. This chair is more of just a little accent in her bedroom, nobody really spend much time in it, so the plasticky feeling fabric is not such a big deal. But it’s not uncomfortable either!
Jenna
September 26, 2015 at 3:10 PMI absolutely adore the cuteness of this chair and your tutorial. I love polka dots! I’d love it if you would stop by and link up this gorgeous makeover at our Best of the Weekend Link Party.
LeeAnn
September 26, 2015 at 7:08 PMYou did a marvelous job and that chair is freaking cute!!
Kammy's Korner
October 1, 2015 at 6:35 PMMy mom called me and told me about this. She has kept on bugging me until I finally got on the net and looked – ya knocked my holey socks right off! It’s way better than she even explained! She said “See, I TOLD you it was cute!!”
Lindsey @ Better After
October 2, 2015 at 10:56 AMWell your mom sounds like the coolest! Haha, thanks! 🙂
Sarah m
October 10, 2015 at 11:21 AMI love it! About how much paint did you use? I saw this and decided right away that I needed a painted fabric project of my own, and voila! Not a few days later my mom has one 🙂 it’s not a lot of fabric, and we’re debating if a sample size paint is enough.
Lindsey @ Better After
October 10, 2015 at 7:40 PMHmmm, it’s hard to say. I probably used between a quart and half a gallon. But I had to coat it many times, so it probably just depends on how thirsty your fabric turns out to be.
Laura
December 30, 2015 at 2:30 PMWhat kind of brush did you use?
Lindsey @ Better After
January 2, 2016 at 4:59 PMHi Laura!
It was a circle foam brush, just like these: http://amzn.to/1JQkr7d
43 Adorably Cute Polka Dots Crafts - DIY Projects for Teens
October 24, 2016 at 8:10 AM[…] betterafter […]
Trending Projects with Polka Dots | Decorating Your Small Space
February 2, 2017 at 12:08 PM[…] at ‘Better After’ teaches us how to paint polka dot upholstery! Yes, paint! Before you pooh pooh this, (c’mon, you’re more creative than closed […]
Stefanie
February 11, 2017 at 12:47 PMCould you just use fabric paint? Rather than adding medium to other paint?
Sillas restauradas: 7 ideas para decorar una silla
May 4, 2017 at 1:24 AM[…] Fuente: better after […]
Pink Panther Insulation Products Blog
June 22, 2017 at 6:35 PMDot Ya Know White Polka
[…] e sponge and just gently twisted it around to form a nearly perfect circle. My s […]
Shirley Peters
March 8, 2018 at 2:44 AMHi Lyndsey,
Love the chair. I read somewhere that you can just use chalk paint, or even emulsion pain (water based paint) then after numerous coats, you have to Beeswax it. It then becomes softer and leather like. Hope this helps.