

They are so fun to make, and way easier than they look.
You will need:
- old books
- paper towels
- small plastic Halloween paraphernalia, spiders, skeletons, etc.
- letters: either scrapbook stickers, foam letters, cardstock cutouts, whathaveyou
- hot glue gun
- Glue n’ Seal
- black craft paint
- metallic craft paint or Rub n’ Buff
- paintbrushes


Step one: Hot glue everything in place on your book cover the way you want it. For the skeleton book, I cut the wings off the bat and hot-glued them on first, then the skeleton right over that. I also hammered thumbtacks into the corners for extra detail. I bought these toys last year at Wal-Mart, they just came in a large bag of novelty toys, but I haven’t seen them this year. Something similar to these toys would work too.
Step two: Once you get everything glued into place, spread a damp paper towel (it’s best to separate it into one-ply) over the book and glue it right over everything. Make sure it’s damp! It will stick much easier that way, and then you can just brush the Glue n’ Seal right over it. Don’t try to make it perfect, the creases and wrinkles are what give it that leathery look. Use a small paintbrush to really jam it into all the crevices nice and snug.
Step three: When the mod podge dries, paint the whole thing black. You will be distressed at this point, because your book will look super lame. DON’T WORRY! The next step is the best part.
Step four: Once the black paint dries, lightly brush the metallic paint over the details. This is what really brings the book to life. I just dab a tiny bit on my fingertip and rub it in. A little goes a long way.


Last year I had a little craft party with my friends, and we made tons of these books, and it was so much messy fun.

(The spiderweb on the “Spells” book was made with hot glue. Just sketch out a web shape, then run a line of hot glue over it).
This year, my friend Alicia figured that the technique would probably work on glass bottles too, and she was right! It works great!

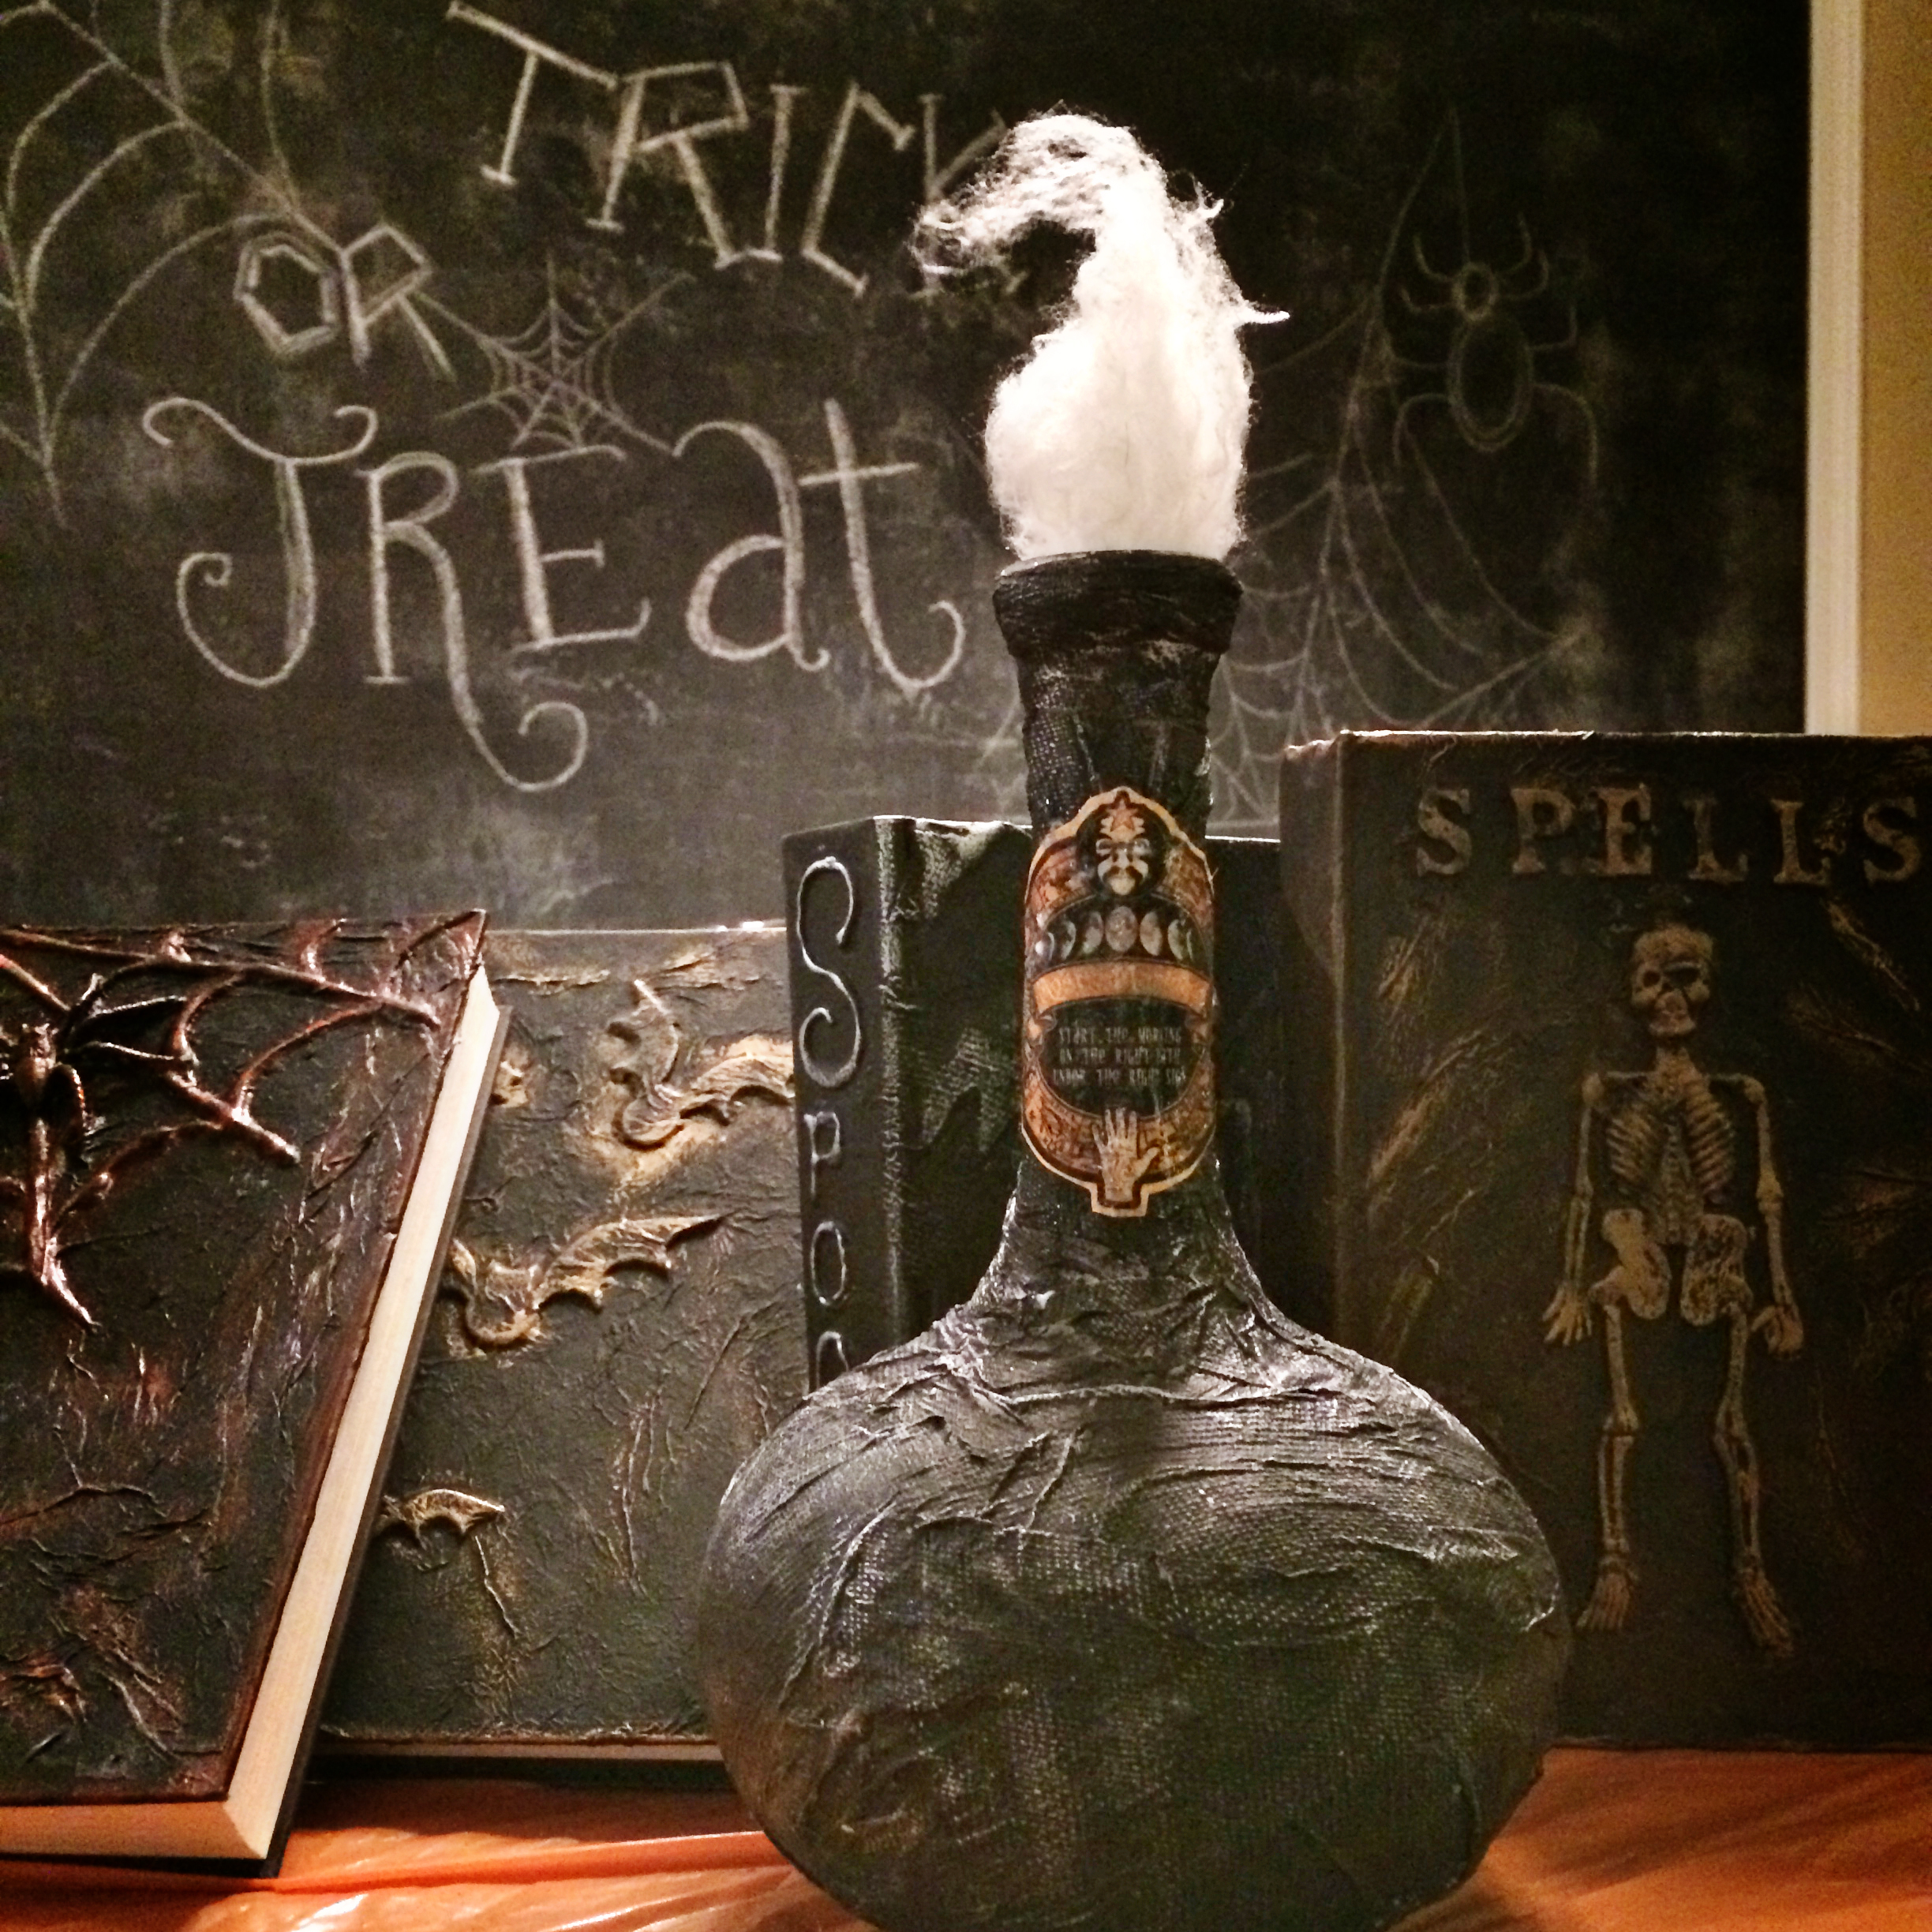
Follow the steps above, slap on a spooky label, and you’re the Queen of Halloween and the envy of all your friends.Here are a few others from Alicia:

If you make some too, I would love to see pics of your work!


Happy Halloween!
*this post contains affiliate links
116 Comments
cara
October 4, 2014 at 1:26 PMGreat tutorial! I am going to try it with some of those fake book boxes they sell at Homegoods. I like my items that look good and have a useful purpose. Thanks!
Lindsey @ Better After
October 4, 2014 at 1:33 PMGenius idea!
LeeAnn
October 4, 2014 at 2:34 PMThank you, Lindsay! This is awesome. I work at used book store so this is right up my alley!
Jake's a Girl
October 4, 2014 at 7:29 PMToo darn cute! Can’t wait to try it. Thanks.
Ally
October 4, 2014 at 8:13 PMHow cool! Thanks for sharing this tutorial.
tracie c.
October 4, 2014 at 11:25 PMpure genius!
Kristina
October 5, 2014 at 9:01 AMAdmittedly I don’t love Halloween, but I do love this idea. I’m trying to think of what other kinds of books I could make using these techniques.
Bee
October 6, 2014 at 9:26 AMI am not really into Halloween but this is so cool.
Melissa Maris
October 6, 2014 at 11:08 AMThese are so awesome. I remember being impressed last year but I’m even more impressed this year!
Linda Uhl
October 6, 2014 at 12:08 PMHi. I was so happy to run across this site, I was in the process of trying to paint a couple of spell
books with paint and stencils, but I wasn’t to happy with how things were going. I made some mistakes, but I am going to try and redo them with this technique. Thanks so much for the info.
They are really awesome, I hope mine turn out as well.
Lindsey @ Better After
October 6, 2014 at 12:24 PMHi Linda! That’s great! So glad I could help. I would love to see your results!
Holly
October 6, 2014 at 12:56 PMThis is ridiculously cool! Thank you for sharing the tutorial!!
Mickey
October 6, 2014 at 9:11 PMLove the books! But I do have a question…do you put a coat of mod podge over the top of the paper towel before you paint?
Lindsey @ Better After
October 6, 2014 at 11:53 PMYes, you will cover the whole paper towel with mod podge, that’s what makes it stick to the book and everything. When that dries, you can paint. 🙂
Diane Johnson
October 8, 2014 at 1:04 PMI have read so many of these and this one is the best. You are so creative. I’m going to do this with my Grandsons Thank you
Tiffany
October 9, 2014 at 10:15 AMLove love love this! I have everything hot glued in place but I have one question…..do you put the mod lodge under the paper towel or on top of the paper towel? Thanks for sharing!
Lindsey @ Better After
October 9, 2014 at 12:03 PMYou can do it either way, it really doesn’t matter. The mod podge will soak through the paper towel and get on both sides anyway. But I typically lay the paper towel down first, and then brush it on top of that, because it helps push the paper towel into all the cracks and creases.
Veronica Butler
October 10, 2014 at 5:33 AMI loved your website! I tried your idea and LOVE LOVE LOVE the results! I just finished my blog and tagged you in it…thank you again!!!!
Kristi
October 11, 2014 at 7:10 AMI love this, this is genius!! I may be giving this a try very soon, thanks for the tutorial! 🙂
sofie
October 12, 2014 at 5:58 AMI love the idea! Even cool to to at school (I’m a teacher).
I’m a fan!
Tracy
October 13, 2014 at 10:29 PMI SO remember these from last year and was telling my sister about them. Glad to see you re-posted them. SO awesome! Happy Halloween!
Tawna
October 15, 2014 at 9:12 PMThese were a boost of inspiration to an idea I was already working on! One difference is I made one using a lenticular picture (one that changes depending on what angle you look at it from) as a sort of “shout out” to the moving photos in Harry Potter’s school books (and pics). You can check out what I made, and see the shout out I gave to you 🙂 , over on my blog: Make It Scrappin. (And I totally copied your idea of the bat wings on the skeleton. A friend told me that was like a shout out to a Zelda character?! ha.) Thanks. They worked great.
Tutorial | Altered Halloween Books – Scrap Booking
October 22, 2014 at 5:00 AM[…] out these awesomely spooky Halloween altered books from Better After! They look really intricate but in fact they are super simple to make. between your crafts stash […]
Spell and Potion Books | My Recipe Confessions
October 22, 2014 at 6:48 PM[…] year I saw these spell and potion books on Pinterest. I found the tutorial on betterafter.net. I was so excited to make them that I invited my neighbors over to make some with […]
Halloween on Pinterest - Simple Sojourns
October 25, 2014 at 11:57 AM[…] awesome are these DIY Halloween Spell Books?!? I can’t wait to give Lindsey’s tutorial a go! Spooky, festive and oh so […]
chris rinck
October 26, 2014 at 6:08 PMDoing this on a small wine bottle now, this is amazing! 🙂
Lindsey @ Better After
October 27, 2014 at 9:02 AMAwesome! I’d love to see your results Chris! 🙂
Brandie
October 29, 2014 at 1:28 PMI am getting started on this project tonight since I have the house all to myself (hooray for bf going out of town! haha!) I just had a couple questions: 1. What kind of brush did you use for the metalic paint? Yours look so perfectly weathered… I am wondering if I should grab a brush or a sponge… 2. With the lettering: did you buy like vinyl style lettering or did you get letters that had some bulk to them and put them under the paper towel and proceed as usual? It is hard to tell by the pics. I guess either would work, but again, yours look so awesome, I would love to replicate!
Thanks in advance for your help!
Lindsey @ Better After
October 29, 2014 at 2:33 PMYou’re so sweet Brandie! Thank you! 🙂 I didn’t use a brush at all for the metallic paint, I just used my finger and rubbed it on the raised parts. Rub n Buff is by far the best product for this, and you only need the tiniest smidgen of it to work, but you can get the same effect with paint. Just use a tiny bit at a time and build from there. The letters I cut myself using my Silhouette machine, but they are just cut out of cardstock and put underneath the paper towel. So they probably need to be bulkier than vinyl, but cardstock worked fine. Good luck! I’d love to see your finished product! 🙂
Carmen
January 3, 2015 at 2:26 AMAwesome tutorial! Do you think it would work to use nail polish instead of metallic paint? No idea where I could find that near my place.
Lindsey @ Better After
January 5, 2015 at 10:46 AMHmmm, nail polish might be tricky, because you need to be able to smear the paint around with your finger. You could give it a try! I’ve found plenty of metallic paint options at Wal-Mart!
Ashley
February 2, 2015 at 7:58 AMTHANK YOU FOR MAKING THIS!!! My room is going to be so cool because of you ♡
Jenny/Minerva
February 15, 2015 at 12:07 PMBrilliant ideas!!! <3
Tana
March 16, 2015 at 4:56 AMThis is freakin’ fabulous! It is the easiest and best tutorial I have seen on making spooky books. I am definitely going to be trying this!
Hope
June 7, 2015 at 7:42 PMHas anyone tried this on a bottle using white gift tissue instead of paper towel?
Sheila
June 24, 2015 at 2:21 PMThis is really brilliant!!! I will use your technique for some future diy projects. Thanks for sharing.
Lauren
July 16, 2015 at 7:57 AMLove love love this!!! Thank you for posting! I’m getting ready to order my supplies and have a few questions. What is that metallic acrylic plaid paint used for? What shade of rub n’ buff is that?
Lindsey @ Better After
July 17, 2015 at 9:48 AMI used the metallic paint in a similar way to the rub n’ buff, just lightly dusted it on with my finger here and there to give it a little more dimension and glimmer. I think the rub n’ buff shade was Antique Gold, but any shade would work!
Lauren
July 20, 2015 at 6:59 AMOne more quick question. What color is that Folk art metallic acrylic paint? I am trying to make mine exactly like yours. They are incredible!!! Thanks in advance for your reply and thanks so much for your time!!!
Lindsey @ Better After
July 21, 2015 at 12:36 PMI think it’s just Copper!
Teri
July 28, 2015 at 7:56 AMI’m making my own styrofoam tombstones this year. Wonder if I could use like saran wrap over skeleton using heat gun to melt plastic over/into tombstone, then paint it?
Lisa
August 17, 2015 at 4:36 PMI am so excited to make these books with my sisters! I am hoping you can tell me where you found your embellishments like the skeleton and bat? I’m trying to find “flatter” things to go on the books. Thanks for your cute ideas!!!
Katie
August 24, 2015 at 6:40 PMI agree I am having trouble finding flat embellishments! Help!
Lindsey @ Better After
August 24, 2015 at 10:14 PMI found them at Walmart! They seem to have them every year! It was a big bag full of plastic bugs and skeletons and cost around $6.
Silvagran
August 25, 2015 at 10:23 PMspookilicous! Oh so going to make some of these books n bottles!
Tina
August 29, 2015 at 1:40 PMIt looks really cool…I’m going to try it! Thanks for sharing.
Robin
September 1, 2015 at 9:44 PMA ghoul after my own heart! Love it! Thanks for the tutorials
Altered Halloween Books Tutorial - A Little Craft In Your DayA Little Craft In Your Day
September 7, 2015 at 12:02 PM[…] Click here to view the full tutorial […]
9 Wicked & Fun Halloween DIY Ideas
September 9, 2015 at 8:01 AM[…] complete so many costumes, and would totally slay as a Halloween decoration. Check out the full Creepy Book Tutorial over at Better After. I absolutely <3 the cheapie decorations they turned into a bat skeleton. […]
Bobby
September 10, 2015 at 6:08 AMThese look fantastic! That said, I’m having a hard time locating something that isn’t way too big for a standard size book from the Walmart site. Do you remember the actual item name/brand of the plastic pieces? Thanks so much!!!
Lindsey @ Better After
September 10, 2015 at 1:47 PMHi Bobby!
It was just a big bag of little items that I found in the Halloween aisle. You know where you would find things like Halloween pencils and plastic cups, etc? It also had lots of other things in the bag, fake bugs, centipedes, frigs, spiders, skulls, etc.
Laura Ancheta
September 10, 2015 at 9:52 AMI did this last night and I am having a hard time with the paper towel having air bubbles under it. Basically when it dried you can see it doesn’t fit snug to my skeleton or bat wings. I tried with a small brush to push it in last night but it definitely happen. When I paint will this be noticeable? Also do I need shiny black paint or is a jar of kids preschool type paint on?
Lindsey @ Better After
September 10, 2015 at 1:45 PMHi Laura! Did you start with a wet paper towel? Also, I sometimes separate it into a single ply if necessary, the thinner the better. If you have air bubbles, just poke a hole in it and smush them down, it should lay across the book crumpled and wrinkly, to make it look more like leather. Any type of black paint is fine, the magic happens after that when you brush on the metallic colors to bring out the details!
Kristine
September 17, 2015 at 4:07 AMThis is awesome. I’ll try make one for this Halloween.
Kristina
September 19, 2015 at 10:19 AMI started the project last night and so far so awesome! I had to order the paint, no where nearby to buy it. So that won’t be done for a few weeks.
I got the books, the paper towels, AND the embellishments at the Dollar Tree. They had packs of flat plastic items in the shapes of skeletons, skulls with hands, centipedes, spiders, roaches, and flies.
Theresa Brundage
September 20, 2015 at 7:21 PMHi Lindsey!
I used your tutorial to make these potion bottles and they turned out fantastic! What a cheap and easy way to make incredible Halloween decor!
Thanks!
https://www.pinterest.com/pin/280278776786757980/
Halloween: DIY Spell Books | fumbleweeds
September 27, 2015 at 10:06 PM[…] blah = time deficit. Time deficit = making things deficit. But then just like that, one little Pinterest success with these spell books, and I’m feeling a need to share. These were an easy-ish, inexpensive project made with my […]
Marie
October 3, 2015 at 2:30 PMHi!! These books look fantastic and I have been creating my own using your instructions, but I don’t understand what you are doing to get the paper towel to fit so snug around the embellishments?? I have done multiple books now and even though they still turn out looking very cool, the paper towel will not fit snug around the embellishments. They bubble up and pop off the details on one side as I’m trying to push the paper towel around the details on the opposite side. Any tips for me? Poking holes in the paper towel to release air just results in the hole tearing and exposing the embellishments. Do you have a video tutorial for this? Thanks in advance!
Lindsey @ Better After
October 5, 2015 at 10:01 AMHi Marie!
I think the biggest thing that helped my paper towel stay down is that I got it wet before I placed it over the book. Then it kind of clung to everything and the mod podge just helped it stick even further. I did poke a few holes in it to get some air out, and if the embellishments show through a little, that’s ok, because you will paint over everything anyway. You’ve inspired me to make a video showing the process, maybe I’ll get around to that this year! 🙂
Madison
October 5, 2015 at 1:13 PMI’m doing a Fantasy art project, so I have a slightly limited budget (and I’m in the UK, in case that may a product name thing) and this is the sort of thing I am looking for because I’m working into old books as it is, and this would be great for my art project!
So for the jars, is it the same process of just adding paper towels then adding the mod podge stuff on top? How do you keep the papers towels on or do you do the mod podge first for jars and bottles?
Lindsey @ Better After
October 7, 2015 at 9:17 AMYes, same process! Just make sure your paper towels are damp with water first, then they will stick onto your bottle easily as you mod podge. Good luck! I’d love to see your results!
Kelly
October 6, 2015 at 4:53 AMI am totally going to Michael’s (and the bookstore) to get supplies this week! I don’t even own a glue gun and I plan to in the next 5 days, lol. Can’t wait to do this! I’ll post pics when I do, if I can figure out how! lol Happy crafting folks!! :oD
Kelly
October 6, 2015 at 5:09 AMAlso! Where did the little label on the bottle come from? I tried to enlarge it and copy it somehow but, have been unsuccessful so far, lol.
Zandryn
October 7, 2015 at 5:52 PMHi. I love this idea and have already started… I do have a question 🙂 Do you wrap the paper towel around the whole book including pages or just the cover? I think I am going to try just the cover but wondered what you did on your project. Also love the idea of a video, I look forward to that for next year! Thanks for your wonderful & hard work.
Lindsey @ Better After
October 7, 2015 at 5:58 PMYep! Just the cover! I do wrap it around the edges, but not the pages.
31 Days of Halloween - Day 9 - Spell Books - Melanie Paquette
October 9, 2015 at 8:06 AM[…] today, we have spell books. I saw this tutorial originally on Better After and thought it looked awesome. It’s the same technique used for the potion bottles I posted […]
Halloween thoughts & ideas! | Adventures of the Napping Purple Soybean
October 13, 2015 at 2:03 AM[…] Decorative Spell Books (tutorial), Necronomicon (tutorial), Hocus Pocus Book (tutorial), Altered Halloween Books (tutorial), Book of Shadows […]
Creepy Halloween Books |
October 14, 2015 at 4:52 PM[…] had so much fun making these scary books for Halloween, inspired by Lindsey at Better After. After making my first batch, I’ve already done a few more rounds so I could give them to my […]
test |
October 14, 2015 at 6:16 PM[…] had so much fun making these scary books for Halloween, inspired by Lindsey at Better After. After making my first batch, I’ve already done a few more rounds so I could give them to my mom […]
Jennifer
October 19, 2015 at 7:35 PMI made a book and it turned out amazing, thank you for such a fun idea! I shared with my mom and she did a lampshade and lamp the same way it is amazing!
Lindsey @ Better After
October 20, 2015 at 7:36 AMWow, I’ve never seen a lampshade done before! I’d love to see a picture! 🙂
janna hite
October 20, 2015 at 9:15 PMDoes it matter if you have to overlap paper towel in areas because of the size of the book?
Lindsey @ Better After
October 21, 2015 at 12:42 PMNope! I would just suggest tearing the edges so it looks a little more natural vs. a straight paper towel edge.
Ellen
October 21, 2015 at 6:10 PMI’m so going to try this and make a non scary sticker book for my 5 year old from a composition note book 🙂
Tina
October 21, 2015 at 11:20 PMFound this just in time for the kids Halloween party. I made these this week and love them. I didn’t have a any craft paint but i did have black, gold and bronze spray paint. So that’s what i used. If i could add a picture i would but i don’t see an option on doing that.
Chrissi
October 22, 2015 at 5:26 AMThank you so much for this tutorial. It worked like a charm. In germany, it is still hard to find nice Halloween decoration that does not look cheap. I found those instructions on Pinterest and it turned out great. Greetings from Germany!
caroleigh
October 25, 2015 at 10:04 AMThis is fantastic. I am a poet, and want to create my own personal book of poetry. This has given me great inspiration. I’m thinking a beautiful blue, with rhinestones, and pearls, or a title in letters, or something…….. my mind is racing …..
Lindsey @ Better After
October 26, 2015 at 10:43 AMThat sounds so cool! I’d love to see your finished product!
DIY Spooky Halloween Decorations | That L.A. Writer
October 25, 2015 at 4:00 PM[…] For detailed instructions, visit Better After’s tutorial here. […]
Witch’s Apothecary | KATNIP BLOG
November 8, 2015 at 7:35 PM[…] https://www.betterafter.net/2014/10/altered-halloween-books-tutorial-new-and-improved.html […]
Erin
April 9, 2016 at 8:00 AMFor the titles of the books (spells/potions) did you just paint the words on? Also do you think marble notebooks would work for this, it would make it easier to have pages for the kids to write on?
Lindsey @ Better After
April 11, 2016 at 2:14 PMThe titles were made using letters that I had cut out with cardstock, using my Silhouette machine. You could use scrapbooking stickers or foam letters too, anything to give it a little raised edge. I think this would probably work on composition notebooks, if the covers are sturdy enough. Once the mod podge dries, it makes the covers extra stiff too.
Erin
April 11, 2016 at 10:34 AMDo you think these would work on marble notebooks? Did you pain the word on or were those toys as well?
SharonJ
May 22, 2016 at 2:09 PMHow do you get the font just right?
Lindsey @ Better After
May 24, 2016 at 1:16 PMHi Sharon! I cut the letters out myself with my Silhouette machine.
Sarah
July 28, 2016 at 2:58 PMI never comment on blogs but this post has changed my life! I have been collecting old books and jars for a year hoping to find the right diy tutorial. I ADORE Halloween and cannot wait to get these started! Thank you!
Mags
August 30, 2016 at 4:18 AMSo clever!! This would be cool on those hollowed-out books you can find at Hobby Lobby or Michael’s – Hide stuff inside!
Halloween Crafting Has Begun!
September 28, 2016 at 10:17 AM[…] Those that know me in real life, know that I love Halloween and I especially love Halloween DIY projects. I was perusing my Halloween Board on Pinterest recently and decided that I really wanted to create some Altered Halloween Books. […]
Krista
September 30, 2016 at 12:11 AMThese books are so awesome! I host a Halloween craft night every year with my friends and for 2016…this will be it for sure! A few questions…How do you mask off the book pages so they don’t get smudged with Glue & Seal/Mod Podge or black paint? (or red wine from my friends? just kidding. sort of) Do you do anything to the book pages to “age” them? And you said that Glue & Seal dries faster than Mod Podge…fast enough for my guests to complete their books in a ~3 hr timeframe? Wondering if I could combine Glue & Seal with black paint and make that all one step…
Laurie
October 1, 2016 at 5:33 AMWhat a wonderful idea! Thank you so much for sharing. I plan to do this at our library’s next Book Art program.
Top Ten Tuesday: Bookish Halloween Crafts – The Bookwyrm’s Hoard
October 24, 2016 at 9:01 PM[…] Make these Altered Halloween Books by Lindsey at Better After. […]
Krista
October 30, 2016 at 3:34 PMMy spell book party was a success! Here are some tips I learned from making them:
* It works best to use 1-ply of a 2-ply paper towel to cover the book (not an as-bought 1-ply sheet, and not tissue paper, it won’t go into the cracks as easily).
* I got my books at Goodwill ($2) and the dollar store ($1)
* I “aged” everyone’s pages using watered-down brown paint, and adding smudges of brown, orange, and yellow chalk with my fingertip
* The words worked out best when I used “thickers,” a brand of sticker I found at Michaels and JoAnn. I also found foam alphabet stickers at the dollar store, but the letters weren’t as defined in the final product.
* Glue & Seal beats Mod Podge, hands down!
* I taped wax paper to the plastic tablecloth for each person, and then gave them additional wax paper sheets to put inside the covers so the pages didn’t get glued or painted
*I found embellishments at Wal-Mart, the dollar stores, and Michael’s (they have little metal “Steampunk” skulls and such in their bead/jewelry dept). I also used shapes and corners cut from adhesive craft foam sheets (Michael’s again).
Thank you so much for this tutorial!
Lindsey @ Better After
October 31, 2016 at 6:17 AMGreat tips! Thanks for sharing Krista!!
Monogram Blog
December 17, 2016 at 11:21 AMSketch Book Mickey Return Address Label
[…] the thinner the better. If you have air bubbles, just poke a hole in it and smu […]
Decal Blog
January 4, 2017 at 3:26 AMHappy Halloween Party Fangtastic Bat Shaped
[…] , to make it look more like leather. Any type of black paint is fine, the magic […]
Awareness Blog
January 12, 2017 at 11:04 PMSketch Book Mickey Return Address
[…] ecessary, the thinner the better. If you have air bubbles, just poke a hole in i […]
Label Blog
January 24, 2017 at 6:42 AMSketch Book Mickey Return Address Label
[…] k crumpled and wrinkly, to make it look more like leather. Any type of black pai […]
Darci
March 28, 2017 at 11:12 AMIf you’d like to see a pic of a steampunk-style book I made, using your tutorial, I’d love to share it with you. It was fun and turned out awesome!
How to Plan a Simple Halloween Party
April 3, 2017 at 3:30 PM[…] you just adore those spooky books? There’s a great tutorial you can check out on Better After so you can customize them yourself. This might be one of my favorite […]
100 Dollar Store Halloween Decor DIY Ideas - Prudent Penny Pincher
August 2, 2017 at 1:45 PM[…] Halloween Spellbooks books + small plastic Halloween items (Dollar Tree) + letters + hot glue gun + black & metallic craft paint You can get the books at Dollar Tree or thrift stores. […]
100 Cheap and Easy Halloween Decor DIY Ideas - Prudent Penny Pincher
August 24, 2017 at 9:32 AM[…] Halloween Spellbooks books + small plastic Halloween items (Dollar Tree) + letters + hot glue gun + black & metallic craft paint You can get the books at Dollar Tree or thrift stores. […]
20 Halloween Decor Ideas from Dollar Tree - Farm Girl Reformed
September 17, 2017 at 12:26 PM[…] 12. Altered Halloween Books […]
Aimee
September 29, 2017 at 7:29 PMI tried it and loved the results your a great teacher. This is the first pin that has worked in months so I thank you!
21 Spooky Dollar Store Halloween Decor Ideas You Need to See! | Just Bright Ideas
October 7, 2017 at 10:01 AM[…] ; How amazing are these Halloween spell books? They’d look great as party props or as part if your Halloween mantel decor. And no one will guess that they started out life as old books and Dollar Store plastic paraphernalia! (via Better After) […]
Chalene
October 13, 2017 at 8:05 AMLOVE these! I made them and also linked the tutorial back to your page: https://chaleneweir.blogspot.ca/2017/10/diy-spell-books.html thank you for the idea! They’re a big hit!
Annie
October 26, 2017 at 10:05 AMI adore this tutorial. I have a question though, can I use elmers glue or do you have to have mod podge or glue n seal? Keep up the great work!
Hermione's Secret Library
October 26, 2017 at 9:12 PMHi! I just wanted to let you known that I tried your tutorial and blogged about it here: http://hermionessecretlibrary.com/2017/10/27/diy-harry-potter-spell-books/
I gave you credit and a link back to your blog. 🙂 Thanks this was a fun tutorial to do!
Holly
October 29, 2017 at 7:46 PMI’m going to try this! Thanks for the great instructions!
Ashleigh
April 6, 2018 at 7:56 PMGreat idea! Thanks so much for sharing! Going to use them for our Harry Potter themed homeschool room! Excited that my kids can help make them too. Question, will everything dry well enough that the book can be handled and used afterward (like a binder or art book) or is it better just to be used as a decoration?
Lindsey @ Better After
April 9, 2018 at 9:07 AMOh yes, they’re very sturdy! My kids love to play with them.
CR8. | Tokeloshe
August 21, 2018 at 12:02 PM[…] Technique used: Altered Halloween Books Tutorial, new and improved! by Better […]
Masquerade. | Tokeloshe
September 4, 2018 at 3:35 PM[…] Technique used: Altered Halloween Books Tutorial, new and improved! by Better […]
38 Cool and Inexpensive DIY Halloween Projects Will Give Your Visitors A Fright |
December 10, 2018 at 11:13 AM[…] Tutorial: betterafter.net […]
Soar. | TOKELOSHE
February 19, 2019 at 6:09 PM[…] Technique used on the hot air-balloon: Altered Halloween Books Tutorial, new and improved! by Better After. Other techniques used were: Faux Rust Painting -Quick, Easy and Cheap! Heat […]
31 Dollar Store Halloween Decoration Ideas
August 11, 2020 at 12:49 AM[…] Via Betterafter […]
100 DIY SCARY HALLOWEEN DECORATIONS - DealCage-Great Store Great Choice!
October 10, 2020 at 10:53 AM[…] Halloween Books Tutorial from Better After […]