
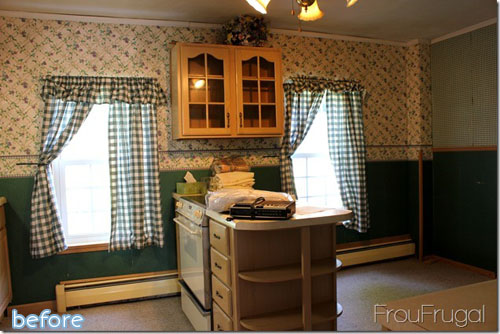
Better After reader Laura was tired of looking at her drab linoleum floor day after day. So she decided to paint right over the top of it! But slapping paint on a floor isn’t as easy as it sounds. Like my dad always says, “Painting is 90% preparation.” So true!
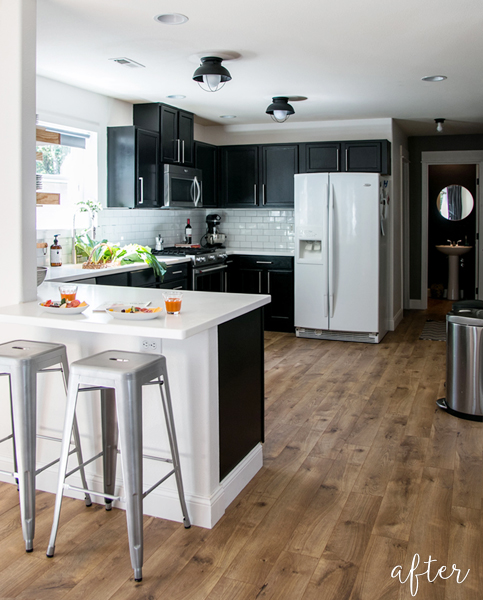
I imagine Laura experienced much bending and kneeling and taping and scuttling around the floor on her shins, plus keeping everyone OUT OF THE KITCHEN! while it cured. So Laura is probably still tired, but happily enjoying her pretty new floor in the meantime!


23 Comments
Amie
June 21, 2011 at 10:40 PMIt looks great, but so tedious! I just don’t have the patience for that kind of detail. Great job she did!
Kathy@ Gone North
June 21, 2011 at 9:00 PMOh My Word!! That is awesome!!
Fantastic transformation!!!!
Please ask her to share the “How-to”
Spinsterhood 101
June 21, 2011 at 9:09 PMYes, I’d love a “how-to” as well. I’d at least like to know what goes into all that preparation 🙂
Inspire Me Heather
June 21, 2011 at 9:13 PMGreat job – it looks fantastic! The lines look so crisp and clean too, eh?
Bente
June 21, 2011 at 9:14 PMWow, that was fantastic. Very nice.
Hugs
Comeca Jones
June 21, 2011 at 9:26 PMwow
craftyashley
June 21, 2011 at 11:07 PMI’m tired just looking at it! It is gorgeous, though!
jennifer768
June 21, 2011 at 11:29 PMPlease share the how to ,it is fantastic !Hugs,Jen
bety
June 21, 2011 at 11:42 PMSo happy to hear the great feedback on my floor. Most of the time spent was waiting for it to dry.
1. Primed floor with two coats of primer.
2. Rolled light grey color over entire floor.
3.Used blue painters tape to lay out my pattern. Border first and then filled in with the lattice design. I bought two different size painters tape.
4. Rolled my dark color over the tape and first color.
5. Peeled up tape and put down two coats of poly. Had some small touch ups before poly.
Tiffany
June 21, 2011 at 11:44 PMShut the front door!!!! That is frickin fantastic!!!
Milk & Cookie Party
June 22, 2011 at 12:03 AMThanks for the tutorial. How did you totally get rid of the “square” look from the laminate? Is it really on the same floor? It does look gorgeous!
Milk & Cookie Party
June 22, 2011 at 12:03 AMThanks for the tutorial. How did you totally get rid of the “square” look from the laminate? Is it really on the same floor? It does look gorgeous!
Milk & Cookie Party
June 22, 2011 at 12:03 AMThanks for the tutorial. How did you totally get rid of the “square” look from the laminate? Is it really on the same floor? It does look gorgeous!
Melinda
June 22, 2011 at 1:38 AMWOW! Awesome job Laura!!
Allyson & Jere
June 22, 2011 at 2:51 AMHOLY CRAP!
Allyson & Jere
June 22, 2011 at 2:51 AMHOLY CRAP!
Allyson & Jere
June 22, 2011 at 2:51 AMHOLY CRAP!
Melissa
June 22, 2011 at 4:59 AMWow! It looks SO amazing. Great job! Everything is so clean & crisp looking. Looks like a whole new kitchen!
toadinaboat.com
June 22, 2011 at 4:57 PMAmazing! I love that she ignored the square embossing of the old floor and went in a whole new direction with it. It looks fantastic. I hope it hold up well in such a high traffic area.
Michelle
June 22, 2011 at 11:37 AMso gorgeous!
cndesigns
June 22, 2011 at 9:49 PMWOW! Several years ago I painted our 1970’s green kitchen vinyl floor. But I wasn’t nearly this creative. It was just “get some off-white paint over that green floor…now!) for me. I really admire the people who do this much beautiful design. Great!
Christine McD
June 22, 2011 at 10:47 PMI would love to win this. There are so many things I want to create!
Mindi
June 27, 2011 at 1:31 AMPick me!!! I would love one!!!