0

Living Rooms

Kitchens

Furniture

7 In chairs/ottomans/seating/ tables/dressers

Feet Me!

Tracy claims to be a “measure once, cut twice” type of gal, (hey, me too!) and consequently never quite fell in love with this overly tall coffee table that she had built long ago.  So she decided to take another whack at it, literally, and de-lengthened the legs, tufted the top, embellished the edges, and curlicued the corners  (I’m stretching, I know) for a delightful bedside bench.  She gives a whole tutorial on her blog SoulStyle.

But wait, there’s more!  She has also solved two of my biggest old-furniture pet peeves: one – Why do old items of furniture always sit flat on the ground?  It bums me out.  And two – Why is it so dang expensive to buy furniture feet to fix problem #1? 
But Tracy is a smarty pants and skipped right past the ‘furniture feet’ aisle at Home Depot, and went straight to ‘fence posts caps’ aisle, where these “feet” were a mere $4 apiece, as opposed to $12 each for the ‘real thing.’  I actually prefer these!  See it on her blog HERE.

sponsored by:

216 In Uncategorized

Simply Spray Upholstery Fabric Paint GIVEAWAY! (GIVEAWAY NOW CLOSED)

(now closed)


Recently, Simply Spray was nice enough to send me a few cans of their Simply Spray Upholstery Fabric Paint.  This product promises to “rejuvenate, restore, or change the color of fabric and can be used on sofas, chairs, pillows, carpets, curtains, lampshades as well as car, boat and RV interior.”

You may know that my DIY mantra boils down to “find thing, spray paint thing,” so naturally this called for my excitedface!  I could basically reupholster a chair with one hand!

They offer tons of colors, and you’ll never guess what I picked.  Ok, you will.  Gray.

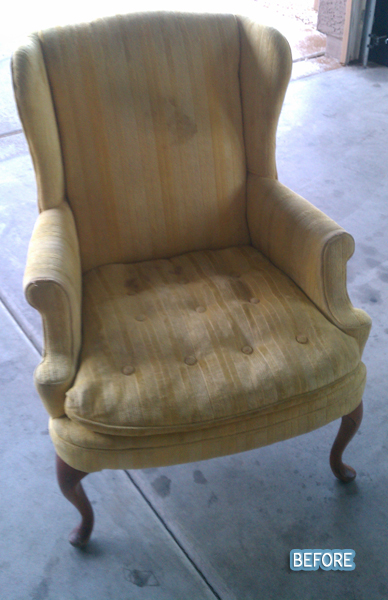
And here is the $5 beauty that I dragged home from a yard sale to be my guinea pig:

Sure, I was having doubts, but Simply Spray ensures that the paint works on all absorbant materials, in addition to being non-toxic, non-flammable, permanent, fast drying and won’t rub off once dry.”

So, I began to spray!  And it looked amazing.  But uh-oh … the paint was not joking around about being absorbent.  It quickly got sucked right into the yellow fabric.  (It was actually a bit shaggier than it looks in the picture.  You know how when you can run your hand across certain fabric and it will lay differently, and you can even play tic-tac-toe on the couch fabric when you’re bored, it was kind of like that.  You know?)

Anyway.

My chair was slurping up the paint as fast as I could spray it.  I concentrated on the back of the chair first, convinced that if I just kept thoroughly spraying, I could really soak it in there and the chair would stop guzzling up my paint.  I burned through an entire can this way.  It was during my frantic paint dance in the driveway that my husband came out and said that I was probably scaring the neighbors again, and I should also consider spraying a light coat over the entire thing, then let it dry, THEN go over it again.

Oh.  Duh. He must have like, read the can or something.

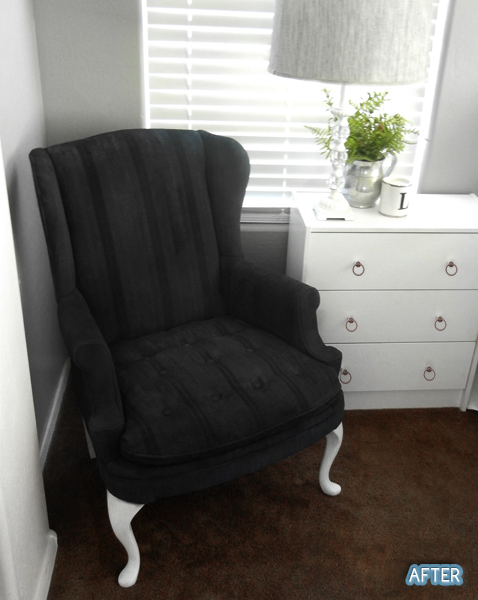
So that’s what I did, and things were considerably easier. It’s quite surprising how soft it feels.  Not stiff or crispy, it just feels like it did before.  And I love that it’s non-toxic too.  Now my humble $5 chair looks pretty great, I think!

(kind of looks black, but I used Charcoal Gray.)

All in all, this chair took six cans of paint total, but I think you could get by on way less if you followed these tips that I learned in this experience:

Don’t use a shaggy, nappy, furry fabric.  Something with a tight weave will need SO MUCH less paint.

Don’t stop and take a break halfway through a can.  They are good for a one-time use only. I probably lost about an entire can’s worth of paint by not continuously spraying until the paint ran out.  Because once you stop, the nozzle clogs quickly and is practically impossible to get going again. 

You can accomplish a drastic color change, like I did here, but it will require more coats.  Sticking closer to similar shades is your best bet. Also, you can’t really lighten a dark fabric.  Trying to repaint this chair yellow would not fly!

So, are you dying to try some Simply Spray out yet?  It’s so fun, I even did a quick little spray on a pair of canvas shoes!   They have fourteen colors available and are always adding new shades.  Enter now to get your hands on some too!

a Rafflecopter giveaway

Giveaway ends Monday, May 28th, winner chosen at random.
  Good luck, and have a great weekend friend!

11 In fashion

Fashion Friday!

Hey!  Remember Fashion Friday?  Let’s have one of those!
Fashion Friday is, you guessed it, makeovers of funky old duds into cute and current clothing.  And it doesn’t get much cuter than Kelsey here and her formal mother-of-the-bride top that she deconstructed into a jacket.  She changed the neckline not only to update it, but also to bypass that endless row of buttons.  She added a bit of scrap fabric to the inner sleeves for an extra dose of color.  So frickin’ cute.  See it on her blog Trash to Trend.

Oh but Kelsey has more tricks up her sleeve than that.  She started with what could easily be the least feminine item of clothing on the planet: an oversize Hanes sweatshirt.  But she sliced it up the middle, added thick black lace on either side and gathered it in the back for a girlified (and super comfy!) blazer.  I don’t think my husband would mind if I did this to a couple of his sweatshirts … maybe probably.
See it HERE.

 Emma found this clearance shirt at Old Navy for a mere $2.60.  That would have been awesome enough for me!  But Emma is one step awesomer, and cut off the sleeves to form bow embellishments on the shoulder.  That is actually several steps awesomer than me.  See it on her blog Ruby Murray’s Musings.

And here is a rare instance when my proximity to senior citizens actually works in my favor!  Big floppy trouser pants!  I’m sure the thrift stores around here are teeming with them.  Emma took these polka-dotted pants, split the inner seam, and whipped up an adorable skirt in minutes.  She actually promises this project will take less than 10 minutes.  Obviously she has never met me and my evil sewing machine.  Check it out on her blog HERE.

And here’s an oldie-but-goodie from Sachiko at Tea Rose Home.  I’m only saying it’s old because this post is from waaaay back in 2010, which is like, a million and five years old in blog years, but luckily not in regular years, because I would totally wear this today!  Sachiko made this look with two clearance t-shirts, so yes, there is an American flag hiding under those ruffles! 

That’s it for Fashion Friday today!  Feel free to send me some of your (or your friend’s!) fabulous fashion restyles.  Then maybe I’ll do Fashion Friday more than once every six months, ha

sponsored by:

13 In kitchen/dining

"Stylized for your Inspection!"

You know how when you check into a hotel room, there’s always a strip of paper laying across the toilet seat declaring it “sanitized for your protection!”  Do you know about that?  Maybe you don’t.  Maybe you only stay in hotels where a sanitized toilet is a given, and not an amenity.  Maybe I should look into those.  Anyway, when my husband and I were trying to buy a house a few years ago, almost every home on the market was a grody gross short-sale.  But we walked through one that was just pristine and beautiful and it had those strips on the toilets!  Ha!  It totally worked; we put an offer in. (Got outbid, darn it).
ANYWAY, long story short, that’s what those orange stickers on the appliances made me think of.  Kalie didn’t care if they were sanitized for her protection or not.  She just wanted them gone, and everything else in this basic builder-grade kitchen too. It’s simply gorgeous now.  Just the crown moulding alone ads a ton of interest and makes the room feel larger.  Lots more to see on her blog Little House Big Plans.

sponsored by:

11 In tables/dressers

Door no more!

Shel found this sturdy old dresser for $50 and fixed it up for her daughter.  She opted to remove the doors and added a shelf to give her girl easy access to toys and books.  So now it’s a dresser and toybox all-in-one!  A droybox.  A tresser.  I’ll work on it.  
When my first son was born (ten years ago), I was excited to fill up a little bookcase for him too. But then my OCDness took over and I couldn’t handle looking at all those brightly colored, mismatched books of various heights, so I literally made a slipcover for the bookcase.  Right over the whole thing, yep. I convinced myself that it was to keep him from pulling the shelves down and ripping the books apart, but really, it was just for me.  I’m happy to report I have relaxed A LOT since then. 
Speaking of relaxing, keep scrolly scrolling down to see what Shel did with those doors she removed … they didn’t go to waste!

sponsored by:

9 In kitchen/dining

From Fancypants to Farm in France

Kimberly’s style has evolved over the last ten years.  (Thankfully, so has mine. Taking the stickers off the plastic pots my houseplants came in was about as stylin’ as I got).  However, even though her old style was less ‘pathetic college person’ and more ‘traditional and formal,’ she was still ready for a change.  Her dining room makeover is a perfect reflection of what she calls her style now: ‘farm girl french.’  It’s lovely. I don’t know what exactly my style has evolved into, but for now I’m happy with ‘way better than before, because yikes.’  
See more of Kimberly’s dining room on her blog Serendipity.

sponsored by:

Protected By
Shield Security PRO