0

Living Rooms

Kitchens

Furniture

11 In Uncategorized

Growing Up!

>>This post is in collaboration with Pennington Vertical Gardening Systems, all opinions are, as always 100% my own.
Yesterday I shared some great garden-themed makeovers from a couple of talented women, and today, I’ve got one of my own!

A few weeks ago, I introduced you to a product I was really excited about, the Pennington Vertical Gardening System.  As a renter with an HOA-maintained yard, I have zip-zero places to plant and grow a garden.  Insert sad face.  I figured my gardening days were over, unless I wanted to help the lawn crew plant some grass or something.

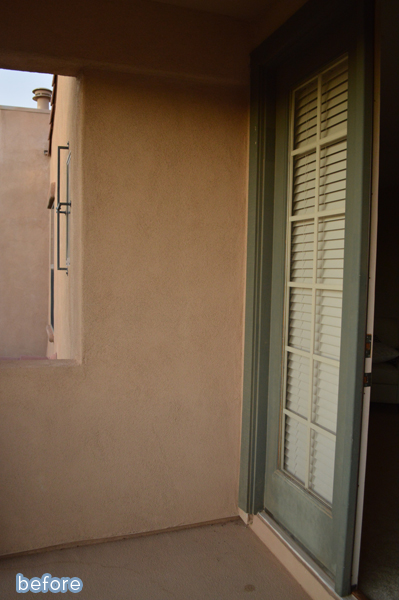
But all I really needed was the smallest sliver of space to try out the vertical garden, and wouldn’t you know, this tiny wall on my bedroom balcony was the perfect size and gets great light.
Vertical gardening system, perfect for renters or anyone with limited space.  betterafter.net

Before, it didn’t offer much.  Only growing cobwebs out here.

But now …
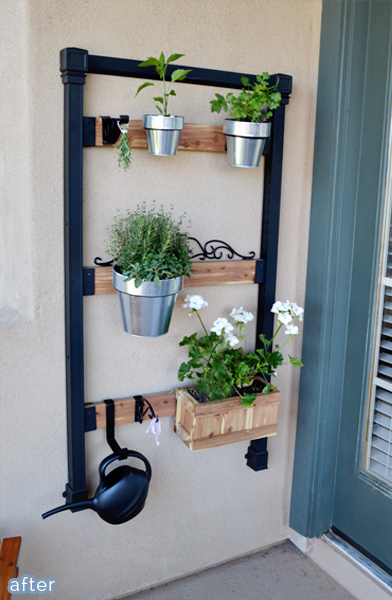
Vertical gardening system, perfect for renters or anyone with limited space.  betterafter.net

I’m growing rosemary, oregano, thyme, cilantro, and even a jalapeno plant! Plus geraniums for prettiness, and room for more!

The vertical garden is completely customizable and re-arrangeable, with plenty of accessories to be found at The Home Depot.

It’s a sturdy, heavy thing, so I was worried about installing it into the stucco wall, but all it took was a set of these guys:

… and it ain’t going nowhere.  The drill bit helped keep the holes nice and neat and easy to patch when we move.  The system can be hung pretty much anywhere: both indoors and outdoors, on drywall, wood, or masonry, like brick and stucco.

With everything looking so nice and shiny on the vertical garden, I noticed that the rest of my balcony was  looking pretty shabby in comparison.  Especially the oxidized metal railing, which had taken a beating from years of direct afternoon sun.  So, I thought I’d share a tip I learned a long time ago to easily restore this type of damage. Get something to write this down, it’s really complicated.

You will need: one old rag and a bottle of mineral oil.

Pour oil on rag, wipe your surface, done.
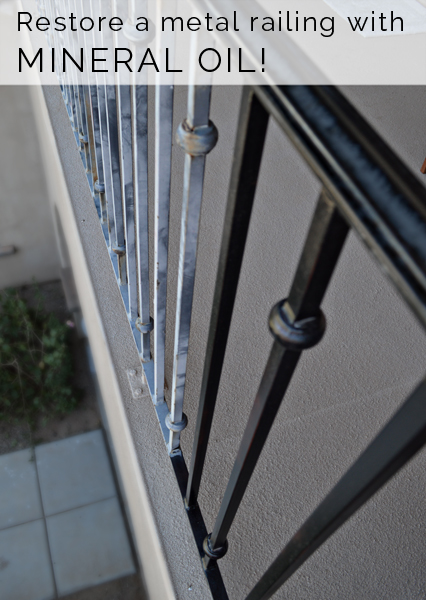
SO simple!  Restore oxidized metal with mineral oil. betterafter.net

Isn’t that an insane difference? The right side looks brand new! It won’t last forever, but it will last as long as you pay attention and rub on a little oil when it starts to need it.  Usually the oil soaks right in with a good rub, and isn’t even greasy to the touch, but do use caution!  Don’t go lubing up the handrail of your tiled stairs or something crazy.
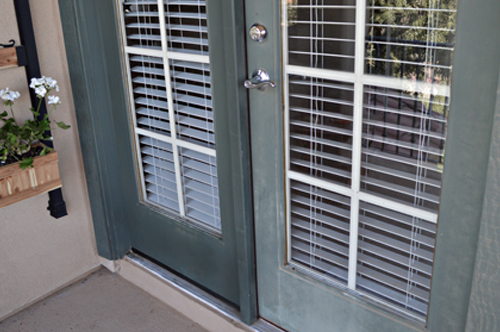
  SO simple!  Restore faded paint with mineral oil. betterafter.net

This also works on painted surfaces, as you can see by my sun-baked set of doors.  Left side is oiled, right side has no oil.  Just be careful the damaged paint isn’t already starting to flake off.  I’ve done this for years and never had any issues with it. The oil just soaks in and needs to be reapplied every once in a while.  But test it out first!  Your climate, surface, and/or paint type could be different and give you wonky results, and we don’t want wonky.
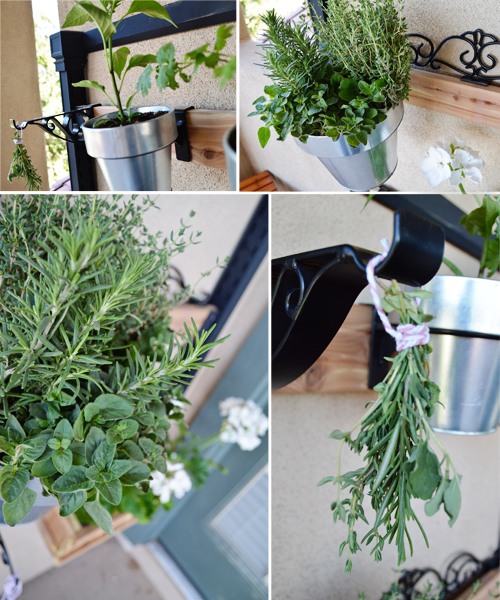

Vertical gardening system, perfect for renters or anyone with limited space.  betterafter.net

Oh! I have to tell you THANK YOU one more time for all the awesome gardening tips you left on my last gardening post.  If you haven’t seen the comments on that post, check them out HERE.  Everyone shared their very best gardening tip, and it’s a treasure trove of information!

 And now, I’m excited to get growing!

Come over for salsa (in three to four months when I have a jalepeno)!
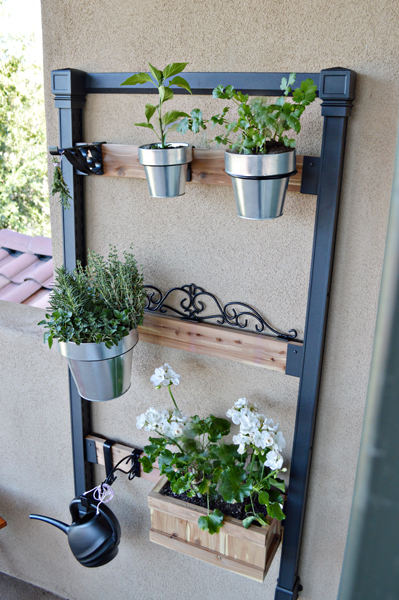
Vertical gardening system, perfect for renters or anyone with limited space.  betterafter.net

Click the link to learn more about Pennington Vertical Gardening Systems and see more gardening systems in action on Pinterest.


Pennington Vertical Gardens partnered with bloggers such as me to help educate us all about their Pennington Vertical Gardening System products. As part of this program, I received compensation. They did not tell me what to purchase or what to say about the use of the products. Pennington Vertical Gardens believes that consumers and bloggers are free to form their own opinions and share them in their own words. Pennington Vertical Garden’s policies align with WOMMA Ethics Code, FTC guidelines and social media engagement recommendations.

2 In outdoors

Garbage to Gardens

If you like growing things AND giving things makeovers, then high-five me sister, because you are going to like today’s projects.

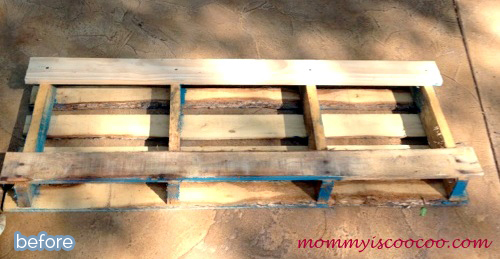
Amanda had an old pallet that was headed for the trash.  “That ain’t right,” she thought to herself (or something along those lines).  So she turned it into a vertical planter! Let’s recap:  she took garbage and grew plants out of it. That’s like, double-saving-the-earth-duty.  She’s pretty much a super-hero.

See her how-to at Mommy Is Coo Coo.


Small garden solutions: a pallet garden!  betterafter.net

Small garden solutions: a pallet garden!  betterafter.net

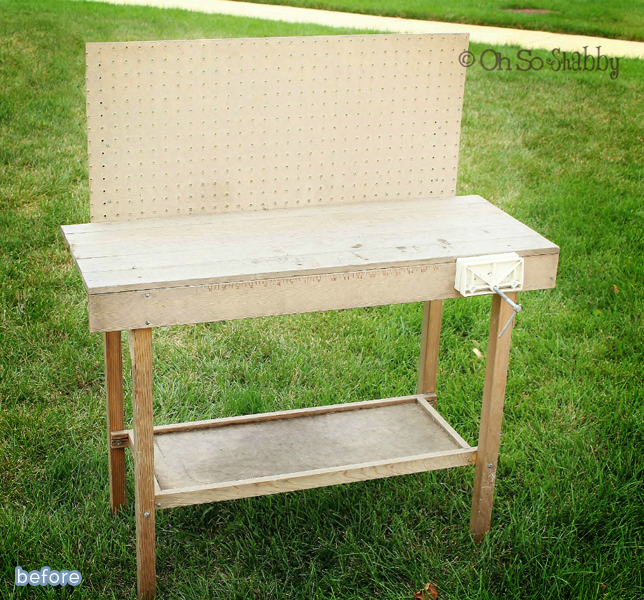
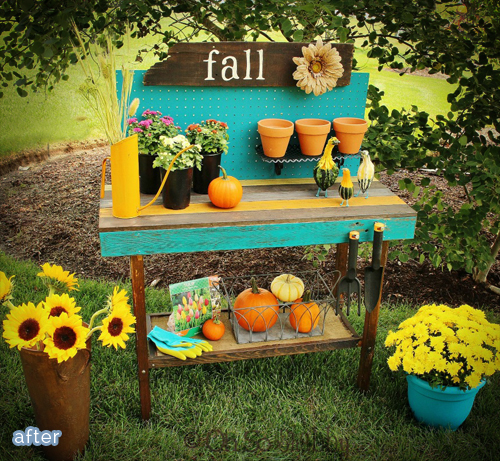
And while Lynda’s little workbench here was still functional, it wasn’t very fun.  (That’s the first secret to keeping yourself out of the dump, old stuff.  Work hard or at least look cute).

But now it’s doing both thanks to Lynda, who transformed it into the colorful gardening center you see before you.  So cute and happy, it makes me want to break into a fall-themed song!  I don’t know any fall songs. Do you?

Anyway, see all the details on her blog Oh So Shabby. You’re going to want to check out those gourd ducks up close!

Garden center makeover!  betterafter.net

Garden center makeover!  betterafter.net

5 In bedroom

Spare some change?

Karen was on a mission to de-blah her bedroom.  Step one: bring in some color.  Step two: that’s it!  That’s really all that was needed here, a few new pillows, cheerful curtains, new bedding, and some fresh upholstery on the bench.  She also crafted up a headboard using an old door, a teal curtain panel and a staple gun.

See, it doesn’t have to be hard! Make some small changes and you can have a happier bedroom by the end of the day too. You deserve it! Don’t you think?  I do.

Read more about Karen’s makeover right here.


Bedroom makeover with simple, colorful updates.  betterafter.net

Bedroom makeover with simple, colorful updates.  betterafter.net

6 In decor/ kiddie/ miscellaneous/ wood

Chest Pains

Kathryn had big visions for this chest, visions that didn’t include the strange swirly things snaking up the sides. But, try as she might, she couldn’t budge them an inch.  “Just make them into flames,” her husband urged.  Pssh, silly boys, what do they know?  Then it hit her.  Make them into FLAMES!  Yes! Brilliant!

Now everyone wins.  Her son got a super cool fire-fighter themed toy box, she got the satisfaction of a job well done, and yes, her husband gets the credit for the idea.  You won’t want to miss what she put on the inside, take a look on her blog The Junk in our Trunks.


Firefighter themed toybox makeover!   featured on betterafter.net

Firefighter themed toybox makeover!   featured on betterafter.net


Deb also had her hands full with a chest in dire need of a makeover. This one had been in the family since way back when Grandma was a teenager and was starting to show its age.  Deb gave it a quick pick-me-up with a fresh coat of paint and stain and poly, then topped it off with a sentimental touch: a hand-painted stamp bearing the family name.  Granny would be proud! And probably want it back!

See more on her blog  Lake Girl Paints .


Heirloom cedar chest gets a timeless update.  featured on betterafter.net

Heirloom cedar chest gets a timeless update.  featured on betterafter.net

3 In living room

Bricks and Tricks

Before there were  iPads and X-boxes and apps and wifi and all that gadget wizardry, there was Brickles. Remember that game? Played on the black and white screen of a toaster-sized Macintosh? Oh man, what fun.  There were like, four levels?  I bet there’s an app for that nowadays. I’m going to find it and introduce my kids to the non-stop thrills of Brickles.

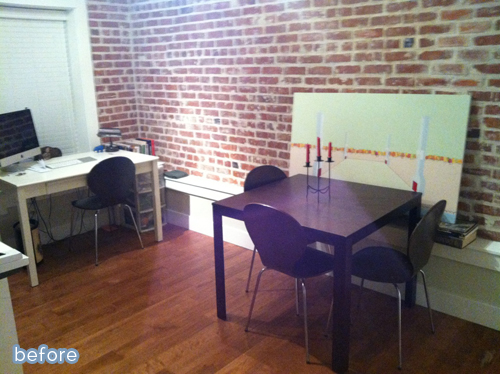
Speaking of vintage bricks, check out these fabulous exposed brick walls of Nicole’s LA home.  Small on space, at 800 square feet shared with her boyfriend, cat, and a snake named Mitch, it’s still big on style thanks to those charming bricks and a few staging tricks from the queens of staging: Robin and Rachel from Madison Modern Home.

Nicole also works with Casa Victoria, a vintage furniture store whose super-fans include set designers for Mad Men, so yeah, this house was never NOT going to be hip.  Get the full tour over on Houzz.


Chic living space, making the most of 800 sf.  ~ from BetterAfter.net ~


Chic living space, making the most of 800 sf.  ~ from BetterAfter.net ~

So warm and cozy! I love this space so much I could probably even share it with a snake named Mitch too.

Maybe.

Chic living space, making the most of 800 sf.  ~ from BetterAfter.net ~

Chic living space, making the most of 800 sf.  ~ from BetterAfter.net ~

10 In decor

Outdoor Spiderweb & Sleepy Hollow Inn Sign Tutorial

>> This post is a collaboration with PLAID Mod Podge, all opinions are as always, 100% my own.

So.  I have a little Halloween project to share with you.  It came out of my own little brain, and it goes a little something like this:

Spooky Outdoor Spiderweb Tutorial! from betterafter.net

Spooky!

Now, I’m very aware that I’m not the first person to make an outdoor spiderweb made out of yarn, but I’m pretty sure the method I used has never been done before.  For good reason.  Consider this a how-NOT-to-do-it-tutorial.

So here’s what happened.  I love all things Halloween, but my outdoor decor has always been a bit lacking.  This picture is not exciting, yes?

Spooky Outdoor Spiderweb Tutorial! from betterafter.net

You are not scared.

Something cool and big (and cheap and easy!) needed to go up on that big expanse of wall.  “A spiderweb!” my little brain squeaked.  “A string-art spiderweb!”

“Great idea brain!” I thought to myself.

So I gathered some supplies:

blueprint1Spooky Outdoor Spiderweb Tutorial made with Stiffy! from betterafter.net

The plan was to nail a spiderweb design onto a 4’x4′ board, wrap it with yarn soaked in Stiffy (a permanent fabric stiffener), let it dry, pop it off the board, and attach it to my wall.

It all made sense in my head.

I rough-measured the amount of yarn I would need, then put it in an old bowl and poured on the Stiffy.

Spooky Outdoor Spiderweb Tutorial! from betterafter.net

Stiffy = awesome.  Totally happy with this product. It does exactly what it says it does.

Putting yards and yards of yarn in a bowl and pouring a glue-like liquid on top, then mixing it exuberantly and expecting it NOT to tangle, because your brain took a vacation at that moment = not awesome.

I enlisted the help of my sister, and we frantically tried to untangle the knotted mess I had made before the Stiffy started to stiffen.

Here are my tips: Don’t do that for crying out loud!  No need to try and make a spiderweb with one continuous piece of yarn.  What am I, a spider?  NO.

Also: wear gloves.

And: don’t worry if you do get a tangle, the Stiffy actually gives you an ample amount of working time before it starts to dry.

Ok, so this is what my board looked like.  It might seem intense, but it’s actually not that bad.  Here are some computer-generated images to help you get the idea of how I wrapped the string.

Spooky Outdoor Spiderweb Tutorial! from betterafter.net

Easy!

This next part looks weird, but if you look closely you can see that the string just rests around the inner nails to give the spiderweb some curve.

Spooky Outdoor Spiderweb Tutorial! from betterafter.net

Spooky Outdoor Spiderweb Tutorial! from betterafter.net

Boom.

But then I ran into another problem.  Damp yarn is … rather stretchy. The spiderweb was getting distorted, so I had to cut short little pieces of leftover yarn and knot most of the intersections together.  There are no pictures at this point because I was starting to panic!

I let it dry overnight (probably much longer than necessary, but I was sick of looking at it).  When I came back the next day, it was stiff as a board!  Which was great. All according to plan.  However … that meant that getting it off the nails was not as easy as my little brain had led me to believe.

Oh, you’ll just pop that right off the board!  Who cares if you used ONE GIANT PIECE OF YARN, thus requiring you to wrap most of the nails excessively?  It’ll wiggle right out of there once it’s been stiffened into concrete!”

LIES!

So, my brain took a backseat while my brawn tried its very hardest to pull the spiderweb off the nails, and finally, finally, I got the last of it free. Pliers were involved, truthfully.

But it’s done!  And I like it!  I hope you do too.  Let’s review what we’ve learned:

– Don’t use one mile-long piece of yarn. 

– Probably don’t even use yarn.  Try a heavy-duty string or twine.

– Have a better exit strategy than me.  (When you think of it, let me know).

Spooky Outdoor Spiderweb Tutorial! from betterafter.net

Would you believe that there is nothing else holding it onto my stucco wall?  It was so stiff, I just kind of bent it into place in the corner.  I picked up the giant felt spider from Michael’s to complete the look.  Give it a try … if you dare!!


The Sleepy Hollow Inn sign was actually a breeze to create in comparison.  I used the easiest method known to mankind.  Print a design, heavily color on the back of it with a dark crayon, tape the design to a board, then follow along the lines of the design with a pen, pushing hard so the crayon on the back is transferred to the board.  Then it’s just a matter of filling in the transferred lines with paint.  It took me one episode of The Voice to finish.

Here is the design I came up with, inspired by countless other Sleepy Hollow signs:

Sleepy Hollow Inn sign tutorial from BetterAfter.net

Obviously, I couldn’t print this on a single piece of paper, so I enlarged the design and taped about six pieces of paper together, then taped the whole thing securely to the board.  Hope that makes sense. The font is a little crazy, but I just stuck to the main shape of the letters when tracing.

Sleepy Hollow Inn sign tutorial from BetterAfter.net

Then, I just filled in all the lines with black paint, added a little yellow on the jack-o-lantern’s face, and after that dried, I dry-brushed a few different colors over the top to age it.  Gave it a good sanding to rough it up, and then one last key ingredient:


Sleepy Hollow Inn sign tutorial from BetterAfter.net

A finishing coat of Outdoor Mod Podge!  This stuff is different than regular Mod Podge, it’s made specifically for helping your outdoor projects withstand everything Mother Nature can dish out.  Genius!  As you can see, my jar has been well-loved.

Check out all the outdoor Halloween projects other bloggers have made using Mod Podge and Stiffy, and be sure to check out PLAID Crafts on Facebook and Pinterest!

Protected By
Shield Security PRO